Best Practices: GravityZone and BEST Policy Configuration – Bitdefender TechZone
Optimize your Bitdefender GravityZone and BEST policy configuration. Move beyond default settings to ensure multi-layered security using specific tuning for HyperDetect, LSASS protection, and Network Attack Defense.
This document serves as a guide to implementing effective policies within the Bitdefender GravityZone platform and the Bitdefender Endpoint Security Tool (BEST). It is designed to help security administrators and IT professionals configure policies for their organization's endpoints based on recommendations coming from Bitdefender.
It is critical to note that "best practices" do not automatically mean "best fit" for every unique situation or organization. The recommendations are general in nature and are not specifically tailored to your organization. These guidelines must be validated against your specific operational context, compliance requirements, and risk tolerance.
For dedicated assistance with validation, deployment, and configuration tailored to your environment, you can engage our Professional Services team.
For new customers of Bitdefender Managed Detection and Response (MDR), the service includes assistance from the Professional Services team for the initial deployment of the GravityZone platform, helping you set up necessary configurations in your environment.
Always Test Your Changes
Before you make any changes to your security policies - no matter how small - you should test them thoroughly. A new rule could accidentally block a critical business application or slow down vital servers. Bitdefender strongly recommends you treat any policy change as a serious deployment that requires verification in a controlled area first.
The rigor of your change process should always align with your company's size and risk appetite - the approval process for an organization with 25 employees will be vastly different from that of a highly sensitive enterprise with thousands of machines. However, the fundamental rule remains: Testing must never be performed in the live production environment.
Once the new policy is applied to the test group, you must verify everything across three critical areas:
Compatibility - ensuring critical business applications are not broken.
Performance - making sure the changes don't cause noticeable slowdowns.
Security - confirming the policy provides the intended protection.
Even for the smallest organization, it is highly recommended to use a staging environment, even if it is very limited (e.g., one or two representative machines). For larger enterprises, this staging phase requires more formal steps, often including a structured ticketing process, approval from a Change Advisory Board (CAB), and a phased, multi-wave rollout across different departmental groups.
General Settings
We will begin by configuring the GravityZone Console, which is essential for centralizing endpoint management and leveraging collected logs and events for comprehensive visibility. The console enables you to reduce your attack surface through risk assessments, deploy patches, manage compliance, and run investigations.
Notifications
Real-time notifications are crucial for staying informed of security events as they happen. The GravityZone Console allows you to set up these notifications, ensuring you can immediately respond to potential threats and maintain an overview of your environment's security status. The type of notifications to be sent and the email addresses they are sent to can be configured for each user. You also have the option to separately configure each notification type using the Send per email option.
To get to the Notification settings, navigate to the right side of the Control Center.
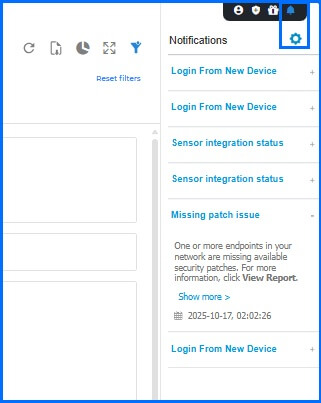 |
We recommend turning on notifications. The types of notifications you should receive depend on your role within the organization. To ensure each team member receives relevant and actionable alerts without being overwhelmed, we will divide the notifications into two distinct groups in this document: Security and Administrative.
Security Notifications
These notifications are critical for security analysts and incident responders, alerting them to potential threats and security events that require immediate attention.
Malware Outbreak.
Anti-Tampering event.
HyperDetect event.
Sandbox Analyzer Detection.
Ransomware Detection.
New Incident assigned to you.
Incident Activity (configure the Severity Score 75+).
Correlated incident.
Administrative Notifications
These alerts are for IT administrators and operations teams, focusing on the operational health and status of the security platform.
License Expires.
Deployment have reached or exceeded license limits.
AD Integration Issue.
Sensors integration status.
Integrations hub issue.
The full list of notification types, along with their detailed explanations, can be found on the Bitdefender Support Center here. You can also find the notification configuration manual here.
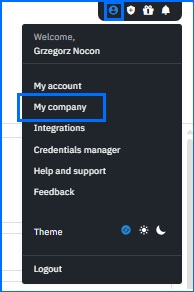
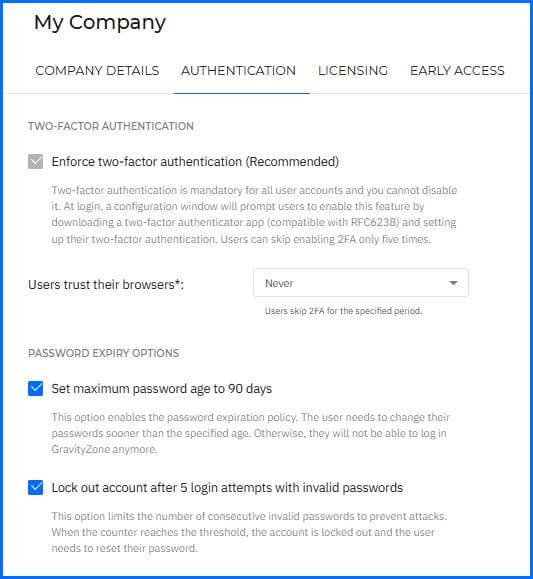
Authentication
Configure strong authentication settings for your user accounts. To configure Authentication, navigate to the right side of the Control Center and open User Menu > My Company > Authentication.
 |
We recommend configuring the following:
Set maximum password age to 90 days.
Lock out account after 5 login attempts with invalid passwords.
 |
More information about Authentication configuration can be found on the Bitdefender Support Center here.
Network inventory
To configure the Network inventory in GravityZone Console, use the menu on the left side and navigate to Configuration > Network Settings.
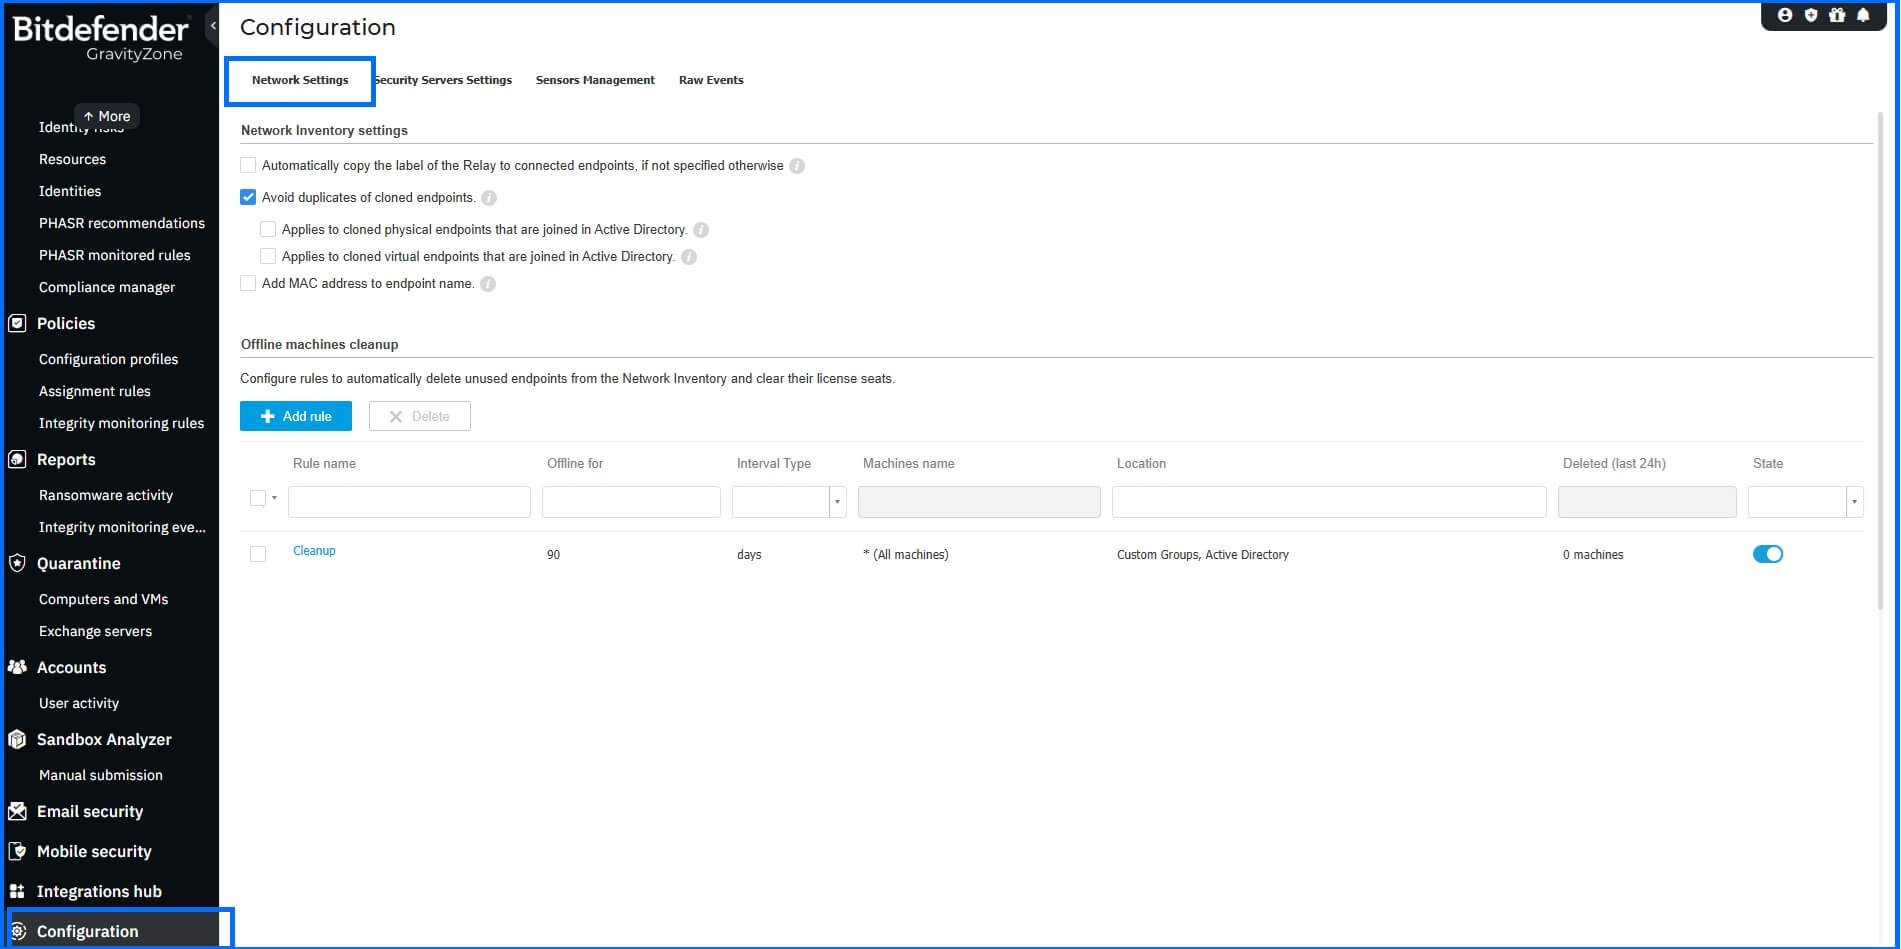 |
We recommend two specific configurations here:
Avoid duplicates of cloned endpoints: Enable this option to differentiate the source endpoints from their clones when you are using golden images.
Offline machines cleanup: Create rules to automatically delete unused endpoints from the Network Inventory. This action frees up licenses for new deployments. If an endpoint comes online again after being deleted, it will be registered and will be visible in the Network section.
 |
More information about Console Settings configuration can be found on the Bitdefender Support Center here.
BEST Policy Configuration
Effective policy configuration is the foundation of a strong security posture. A well-defined policy provides consistent and reliable protection. Policies in Bitdefender GravityZone are highly granular, allowing you to tailor security settings to different groups of endpoints based on their function, location, or type.
Agent
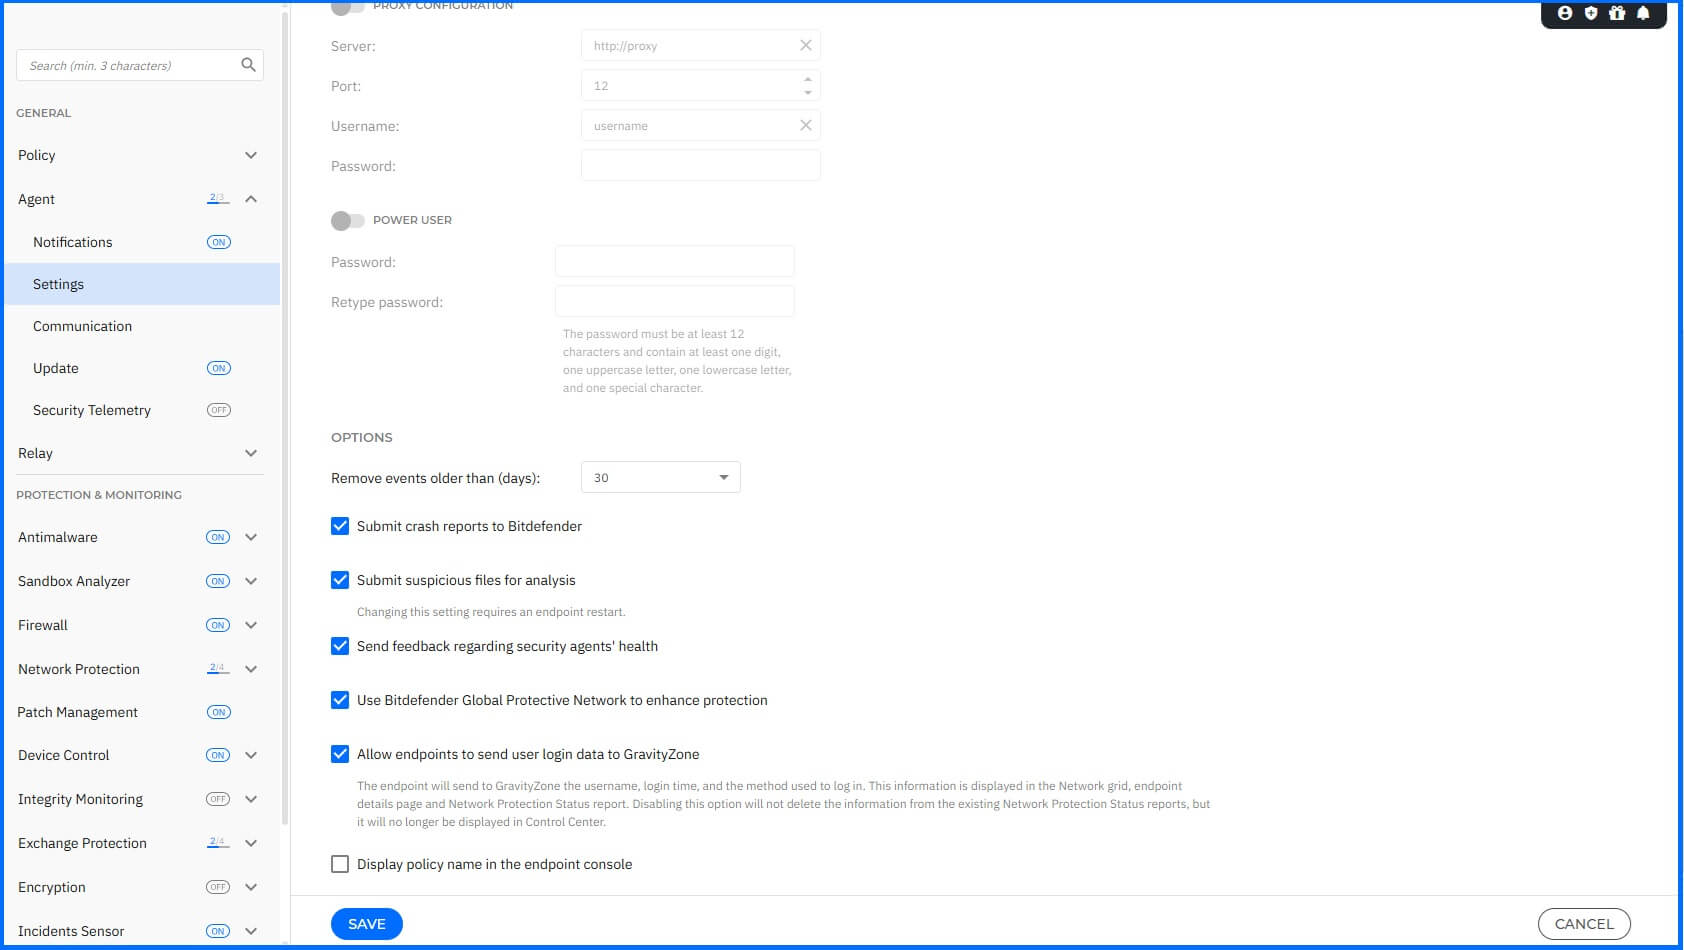
General settings within the policy allow you to manage user interface display options, password protection, proxy settings, power user settings, communication options, and update preferences for the selected endpoints.
Settings
Navigate to the Agent > Settings section to configure the uninstall password, which prevents users with administrative rights from unauthorized removal of the BEST agent. You can also connect users with their computers from this section.
We recommend configuring the following:
Set uninstall password: This prevents users with administrative rights from unauthorized uninstalling the BEST agent. This uninstall password, however, won't stop advanced threat actors, who use more advanced tampering techniques. To configure Anti-Tampering protection, navigate here.
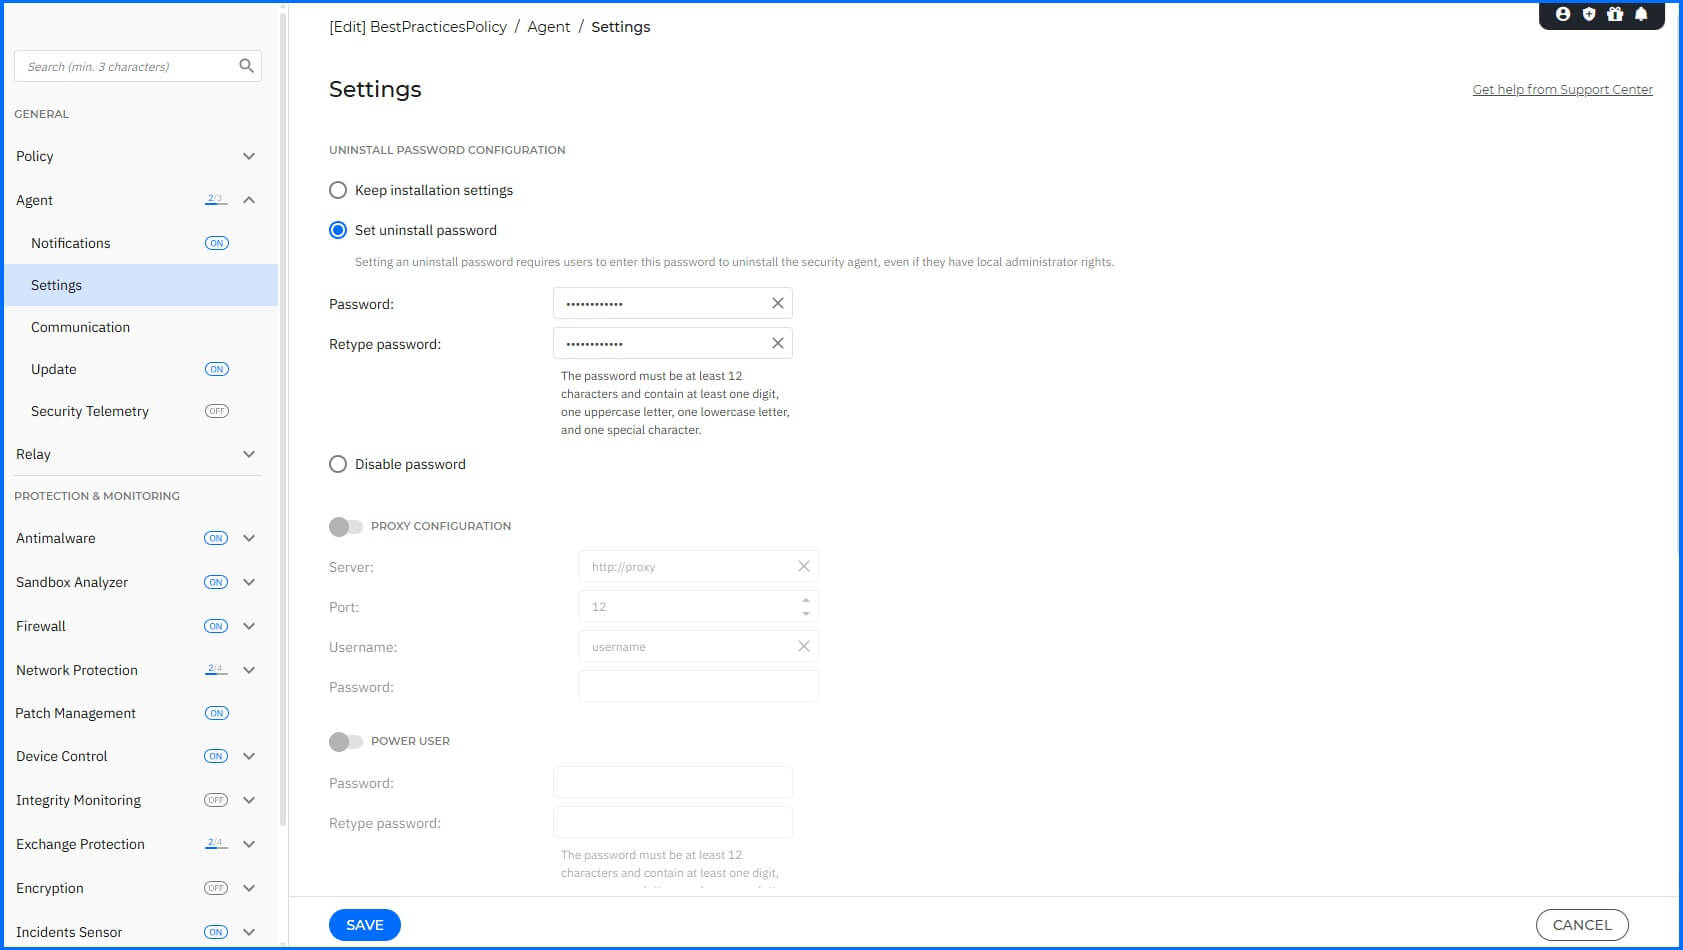
Allow endpoints to send user login data to GravityZone: Enable this option to see the logged-in user on their machines within the Network section.
More information about BEST Settings configuration can be found on the Bitdefender Support Center here.
Update
Navigate to the Agent > Update section to configure the BEST agent and security content update settings.
We recommend configuring the following:
Product Update: Set a one-hour update interval. For non-persistent VDIs, disable product updates to avoid frequent reinstalls.
Security Content Update: Set a one-hour update interval to ensure endpoints are always protected with the latest security definitions.
Update Ring: The update ring should be configured to use the Slow ring for stable, well-tested updates. However, for larger organizations that have a staging or testing environment, the Fast ring can be used to identify any potential issues with new updates before they are deployed broadly across your production endpoints.
 |
More information about Update configuration can be found on the Bitdefender Support Center here. An overview of our software release strategy is available here.
Antimalware
The Antimalware module is the foundation of your BEST, providing a multi-layered defense that proactively protects against a wide range of threats, from traditional malware to advanced, fileless attacks and ransomware. This section details the configuration for key settings, including On-Access, On-Execute, On-Demand, Anti-Tampering, HyperDetect, and Advanced Anti-Exploit.
On-Access Scanning
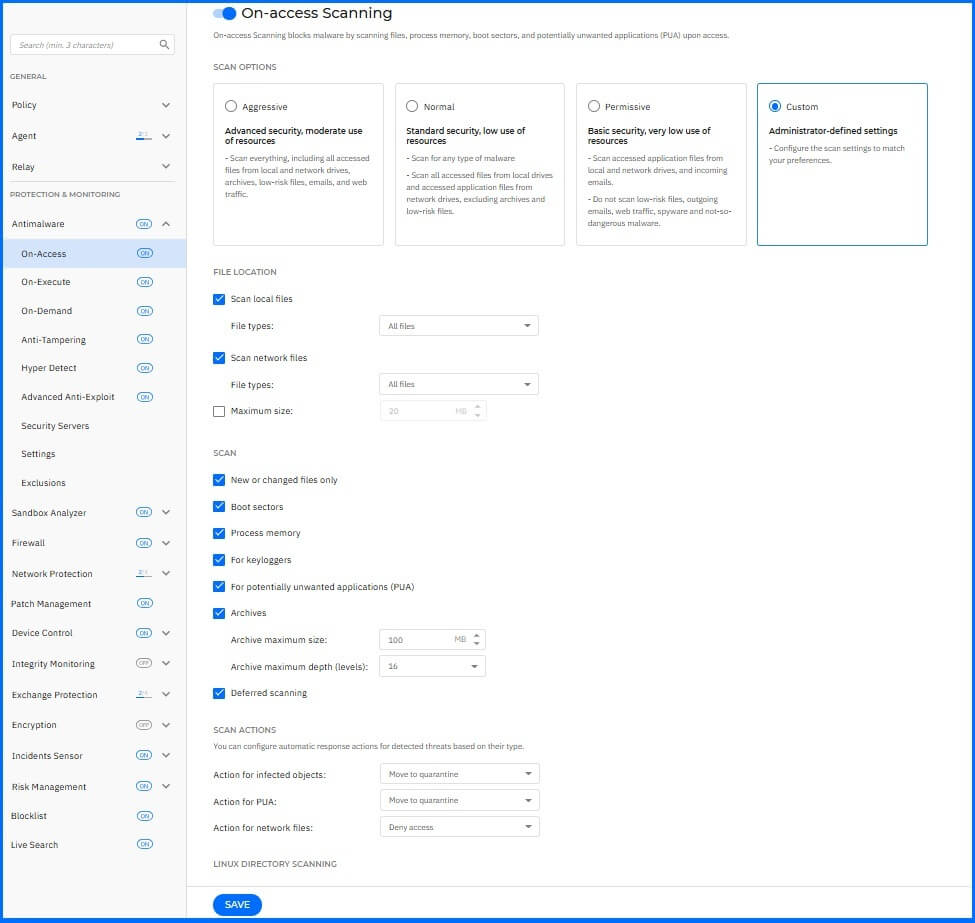
Malware protection prevents new malware threats from entering the system by scanning local and network files when they are accessed (opened, moved, copied, or executed). Navigate to Antimalware > On-Access to configure antimalware protection.
We recommend configuring the following:
Scan Options: Set Normal scan sensitivity for workstations and Aggressive for servers to tune them in the next steps. You can read more about the configuration behavior here.
Scan Local Files: Select All files.
Scan Network Files: Select All files.
Scan: Enable the following scanning options:
New or changed files only.
Boot sectors.
Process memory.
For keyloggers.
For potentially unwanted applications (PUA).
Deferred scanning.
Scan Archives: Select this option if you want to enable on-access scanning of archived files. Scanning inside archives is a slow and resource-intensive process. If you decide on using this option, we recommend that you set up 100MB as a maximum archive size and 16 as a maximum archive depth.
Max File Size: Leave this unchecked. For system performance reasons, you can limit the maximum file scan size. Use this option wisely, because malware can affect larger files, too.
Default Action:
Action for infected objects: Move to quarantine. Select this option if you want to move the detected process, file, or item to quarantine, without taking any other action. In case of false positives, it's the safest option to prevent situations where BEST might delete the item. The Remediate action is recommended when you want to run cleanup tasks that can delete not only the detected process but also all its activity, such as newly or modified registry keys that can be used by attackers for persistence techniques.
Action for PUA: Move to quarantine. Select this option if you want to move the detected process, file, or item to quarantine, without taking any other action. In case of false positives, it's the safest option to prevent situations where BEST might delete the item. The Remediate action is recommended when you want to run cleanup tasks that can delete not only the detected process but also all its activity, such as newly or modified registry keys that can be used by attackers for persistence techniques.
Scan Linux directories: Enable this option if a Linux machine is under the policy.
 |
More information about On-Access Scanning configuration can be found on the Bitdefender Support Center here.
On-Execute Scanning
On-Execute Scanning protects against malicious processes during their execution stage. Navigate to Antimalware > On-Execute to configure this layer of protection.
We recommend configuring the following:
Cloud-based Threat Detection: Enabled.
Advanced Threat Control (ATC): Enabled.
Action for infected applications: Remediate.
Sensitivity: Set Normal scan sensitivity for workstations and Aggressive for servers. You can read more about the configuration behavior here.
Sensitive Registry Protection: Enabled, with the action set to Kill processes.
Kernel-API Monitoring: Enabled.
Fileless Attack Protection: Enabled.
Command-line Scanner: Enabled.
Antimalware Scan Interface Security Provider: Enabled. This function enables scanning content at a deeper level using Windows Antimalware Scan Interface (AMSI) integration.
Report analysis results to Antimalware Scan Interface: Enabled.
Ransomware Mitigation: Enable.
EFS Protection: Enable.
Monitoring: Enable.
Local: Enable.
Remotely: Enable.
Recovery: Automatically.
 |
More information about On-Execute Scanning configuration can be found on the Bitdefender Support Center here.
On-Demand Scanning
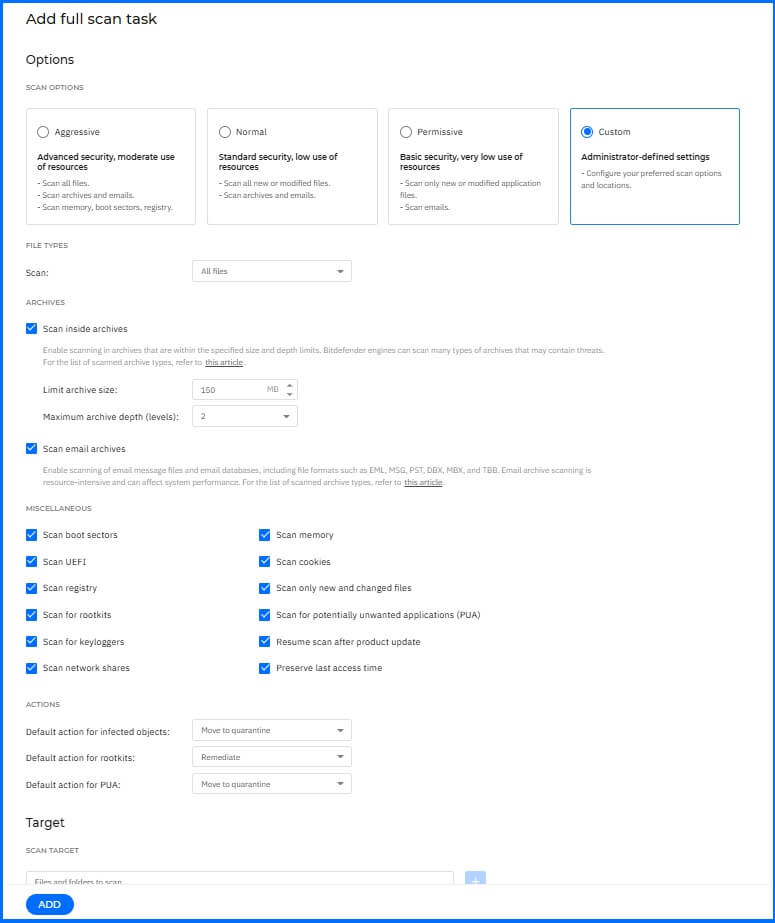
To configure antimalware scan tasks that will run regularly on the target computers, according to a defined schedule and customized scanning options, navigate to the Antimalware > On-Demand section. We recommend two types of regular scanning: a weekly full scan and a daily quick scan.
Weekly Full Scan
A weekly full scan checks the entire endpoint's resources and, depending on its configuration, can have an impact on performance. We recommend configuring Weekly Full Scan with the following:
Run the task with low priority: Enabled.
Enable CPU usage control: This option allows you to adjust the CPU usage allocated for the scanning process and tailor the scan performance to your needs. Lower CPU usage results in longer scan times, while higher CPU usage speeds up the scanning process.
Sensitivity: Set Normal scan sensitivity for workstations and Aggressive for servers. You can read more about the configuration behavior here.
Scan: All files.
Scan inside archives: Enabled.
Limit archive size: 150MB
Maximum archive depth: 2
Scan: Enable the following scanning options:
Scan boot sectors.
Scan memory.
Scan UEFI.
Scan cookies.
Scan registry.
Scan only new and changed files.
Scan for rootkits.
Scan for potentially unwanted applications (PUA).
Scan for keyloggers.
Resume scan after product update.
Scan network shares.
Preserve last access time.
Actions:
Default action for infected objects: Move to quarantine. Select this option if you want to move the detected process, file, or item to quarantine, without taking any other action. In case of false positives, it's the safest option to prevent situations where BEST might delete the item. The Remediate action is recommended when you want to run cleanup tasks that can delete not only the detected process but also all its activity, such as newly or modified registry keys that can be used by attackers for persistence techniques.
Default actions for rootkits: Remediate.
Default actions for PUA: Move to quarantine. Select this option if you want to move the detected process, file, or item to quarantine, without taking any other action. In case of false positives, it's the safest option to prevent situations where BEST might delete the item. The Remediate action is recommended when you want to run cleanup tasks that can delete not only the detected process but also all its activity, such as newly or modified registry keys that can be used by attackers for persistence techniques.
 |
Daily Quick Scan
A quick scan detects malware running in the system. We recommend using the predefined quick scan policy with its default configuration. This scan typically takes less than a minute to complete and has a very low impact on performance.
Scanning endpoints regularly is a proactive security measure that can help detect and block malware that might evade real-time protection features. More information about On-Demand Scanning configuration can be found on the Bitdefender Support Center here.
Anti-Tampering
To configure the Anti-tampering module, navigate to Antimalware > Anti-tampering. This functionality provides protection when attacks are attempted to disable the BEST agent or tamper with its modules.
We recommend configuring the following:
Vulnerable drivers: Enable with action Deny access.
Callback evasion: Enabled with action Isolate endpoint.
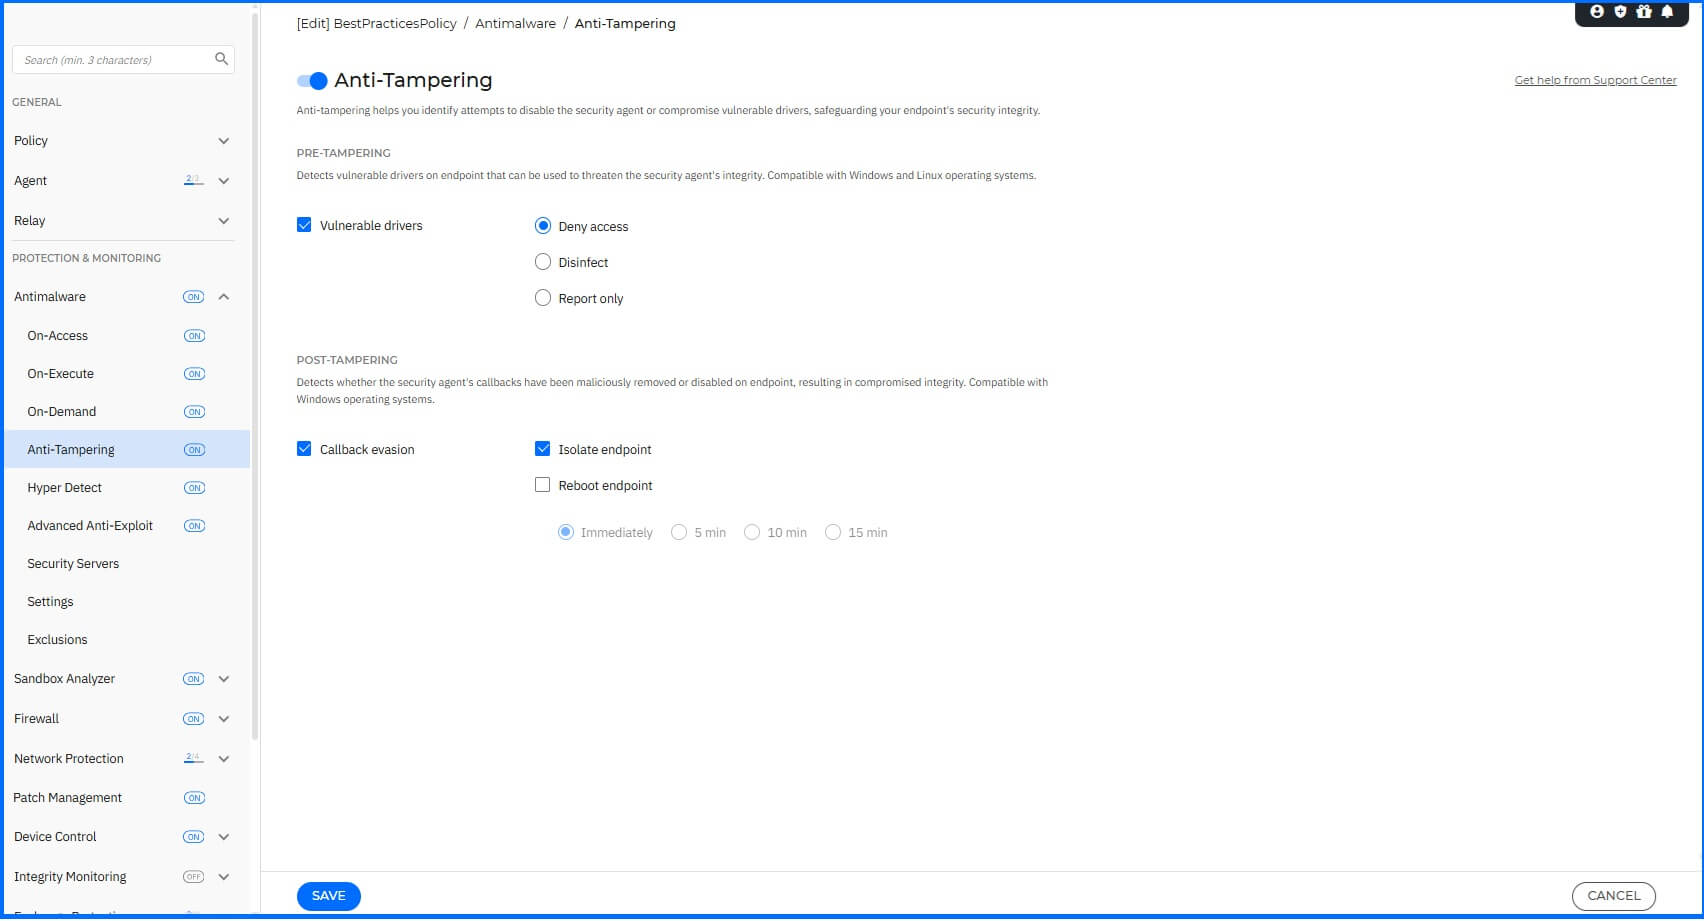 |
More information about Anti-Tampering configuration can be found on the Bitdefender Support Center here.
Hyper Detect
Hyper Detect is an additional layer of tunable machine learning and heuristic analysis that works on top of existing scanning technologies (On-Access, On-Demand, and Traffic Scan). It's designed to help identify potential misuse, detect and block advanced, targeted attacks, and suspicious activities during the pre-execution stage. We recommend regularly reviewing the Hyper Detect Activity report to verify if any legitimate administrative tools were incorrectly blocked by false positives. To configure the Hyper Detect module, navigate to Antimalware > Hyper Detect.
We recommend creating two separate profiles for workstations and servers.
Workstation Profile
For workstations, we recommend configuring the following:
Hyper Detect: Enabled.
Targeted attacks: Enabled with action Normal.
Suspicious files and network traffic: Enabled with action Normal.
Exploits: Enabled with action Normal.
Ransomware: Enabled with action Aggressive.
Greyware: Enabled with action Normal.
Actions:
Files: Move to quarantine with Extended reporting on higher levels enabled.
Network traffic: Block with Extended reporting on higher levels enabled.
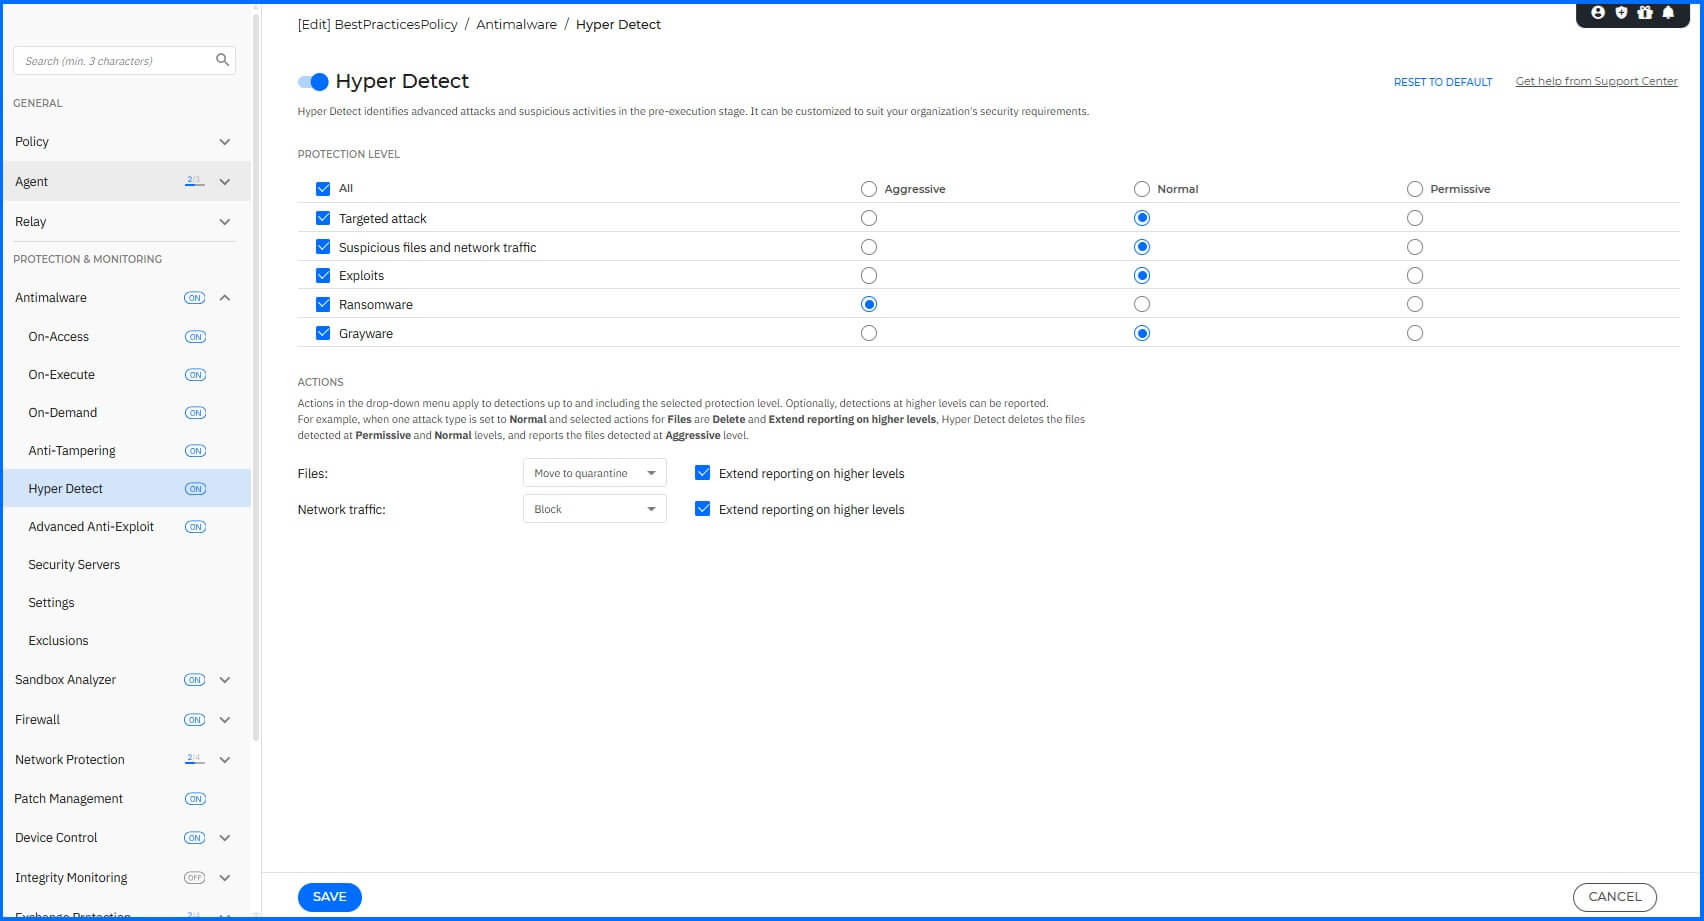 |
Server Profile
For servers, we recommend configuring the following:
Hyper Detect: Enabled.
Targeted attacks: Enabled with action Aggressive.
Suspicious files and network traffic: Enabled with action Aggressive.
Greyware: Enabled with action Aggressive.
Actions:
Files: Move to quarantine with Extended reporting on higher levels enabled.
Network traffic: Block with Extended reporting on higher levels enabled.
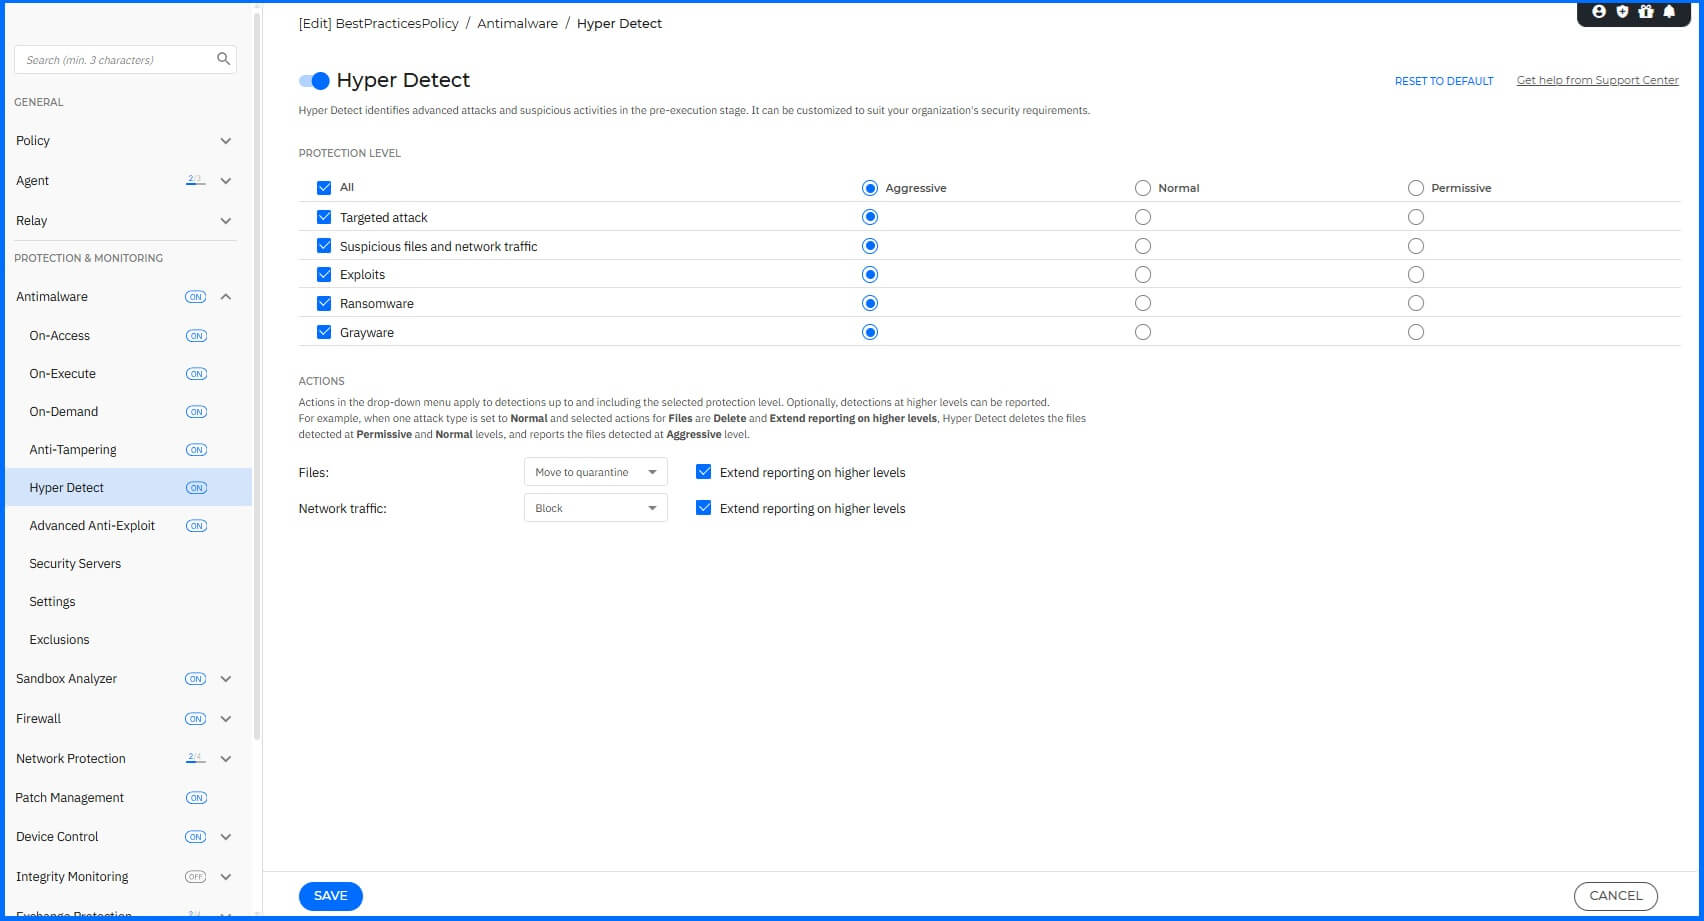 |
More information about Hyper Detect configuration can be found on the Bitdefender Support Center here.
Advanced Anti-Exploit
Advanced Anti-Exploit protects against zero-day attacks and memory-based exploits by detecting and blocking malicious code that attempts to exploit vulnerabilities in applications like web browsers and Microsoft Office. To configure the Advanced Anti-Exploit module, navigate to Antimalware > Advanced Anti-Exploit.
We recommend configuring the following detections for Windows:
Advanced Anti-exploit: Enabled
Process introspection: Enabled with action Kill process.
Privilege escalation: Enabled with action Kill process.
LSASS protection: Enabled with action Block only.
We recommend configuring the following detections for Linux:
Advanced Anti-exploit: Enabled
Credentials monitoring: Enabled with action Report only.
Ptrace monitoring: Enabled with action Report only.
Namespace monitoring: Enabled with action Report only.
Corruption monitoring: Enabled with action Report only.
SUID monitoring: Enabled with action Report only.
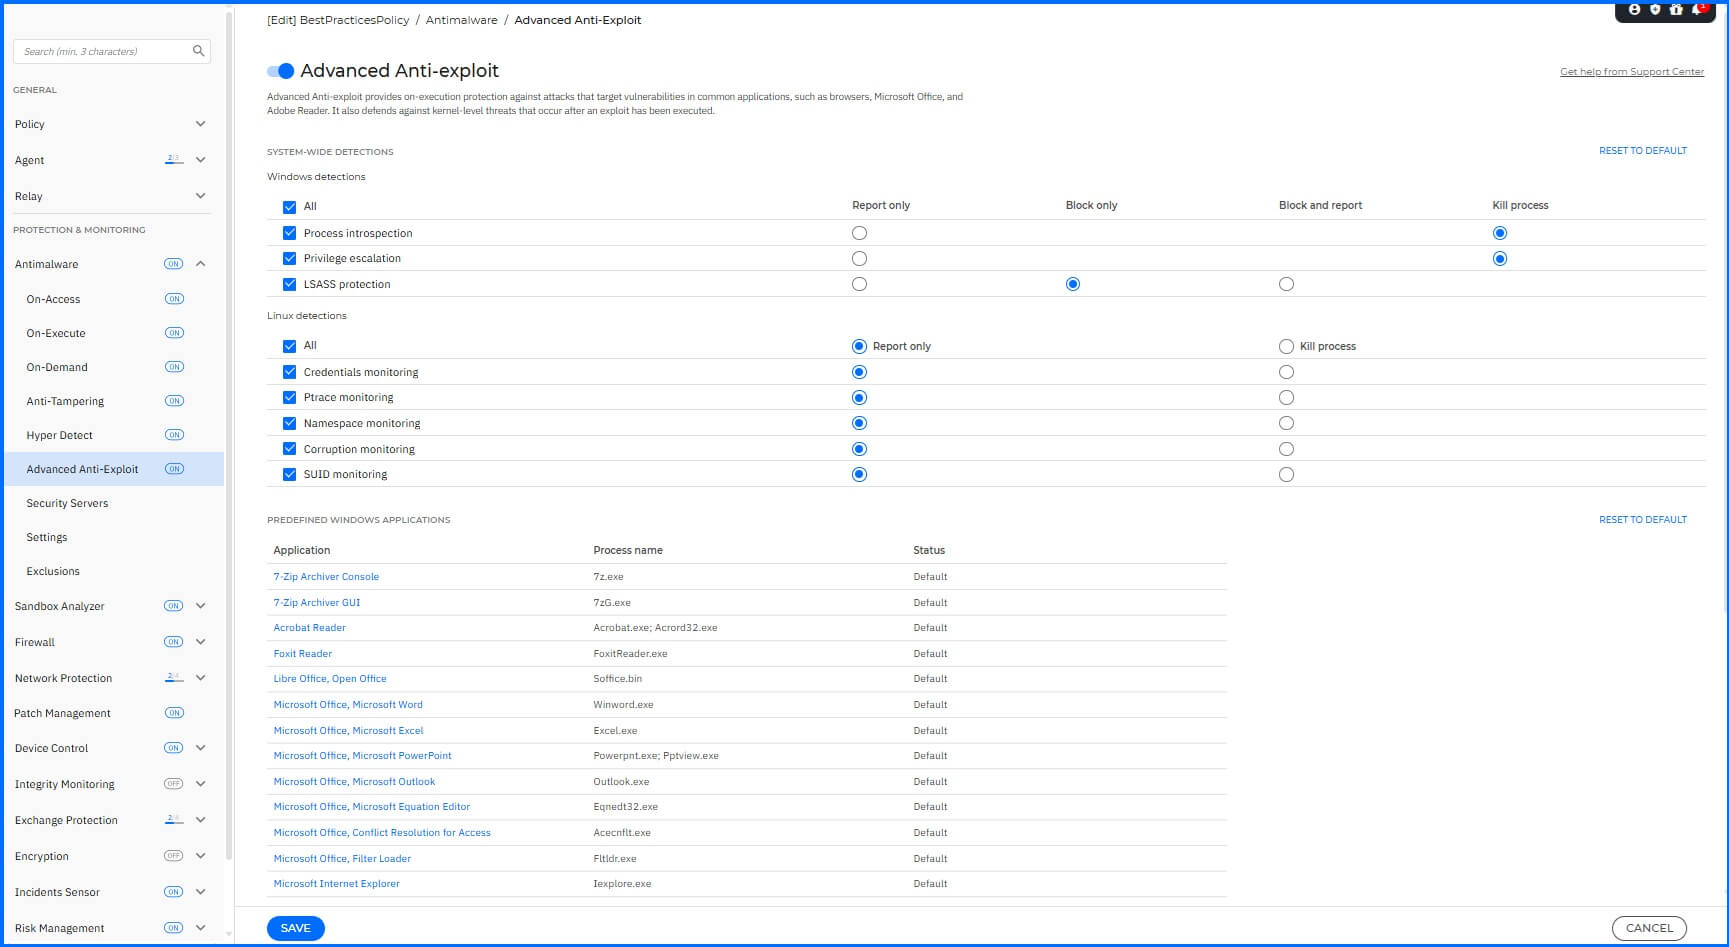 |
More information about Advanced Anti-Exploit configuration can be found on the Bitdefender Support Center here.
Settings
To configure quarantine settings, navigate to Antimalware > Settings section.
We recommend the following configurations:
Delete files older than (days): Set to 30 days.
Submit quarantined files to Bitdefender Labs every (hours): Set to 1 hour.
Rescan quarantine after security content updates: Enabled
Copy files to quarantine before applying the disinfect action: Enabled
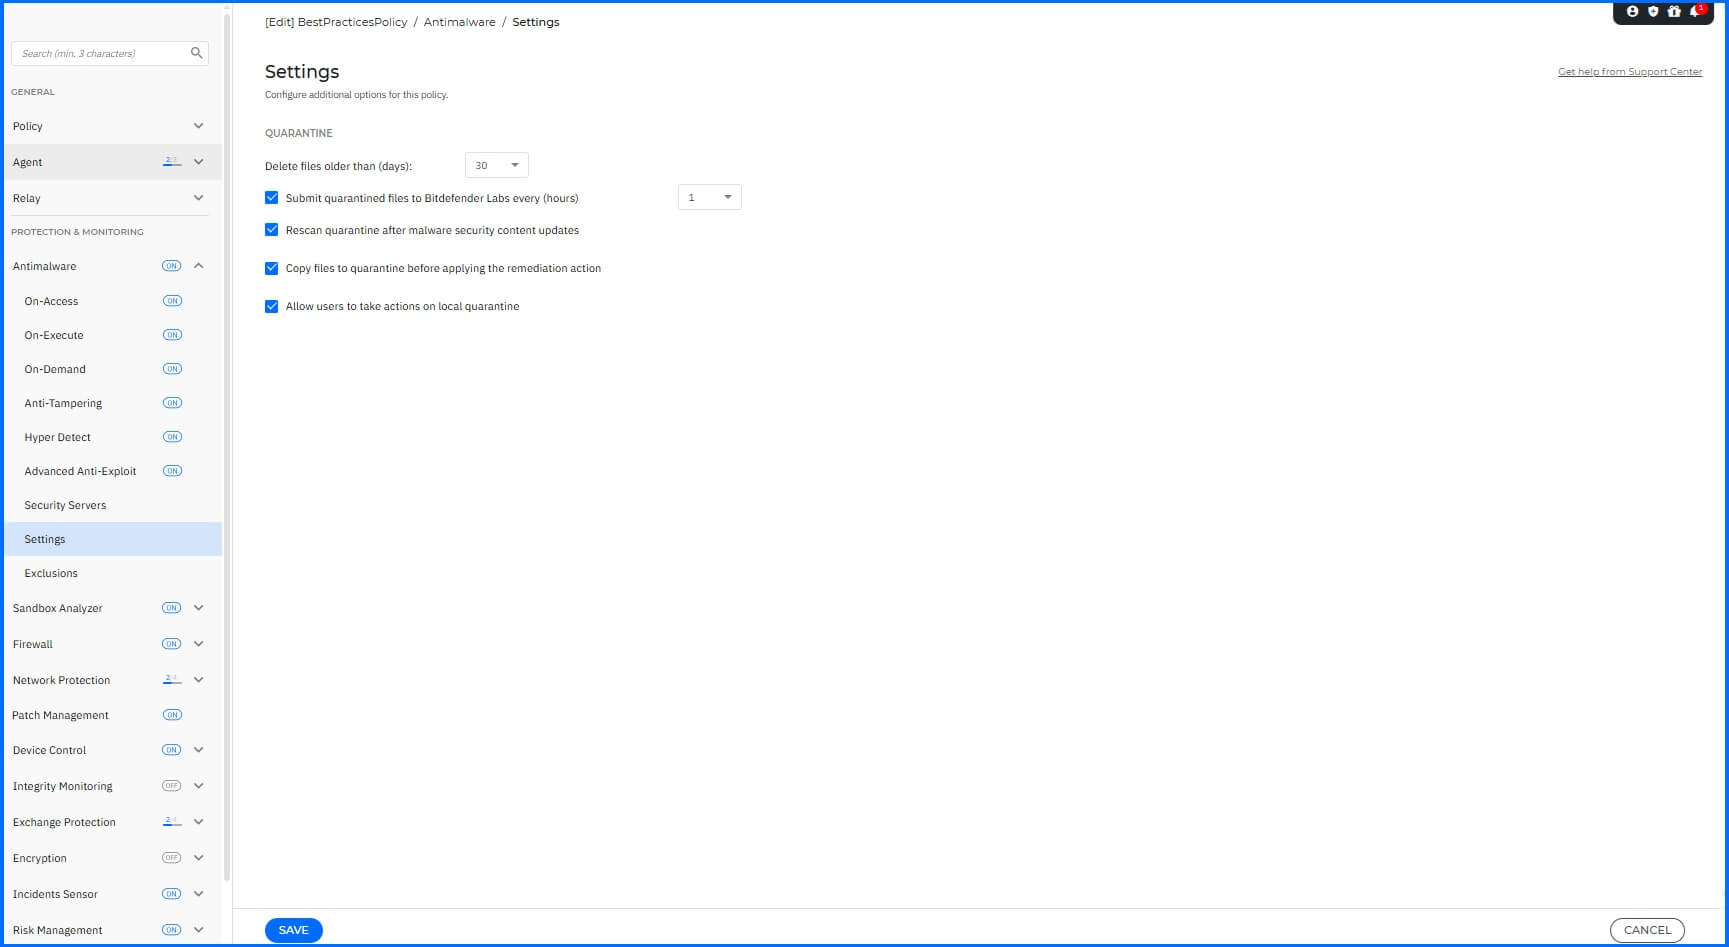 |
More information about Settings configuration can be found on the Bitdefender Support Center here.
Exclusions
To configure exclusions for the BEST, navigate to the Antimalware > Exclusions section.
We recommend the following configurations:
Recommended vendor and product exclusions - Enable this option to use default exclusions provided by Bitdefender for compatibility with common third-party software.
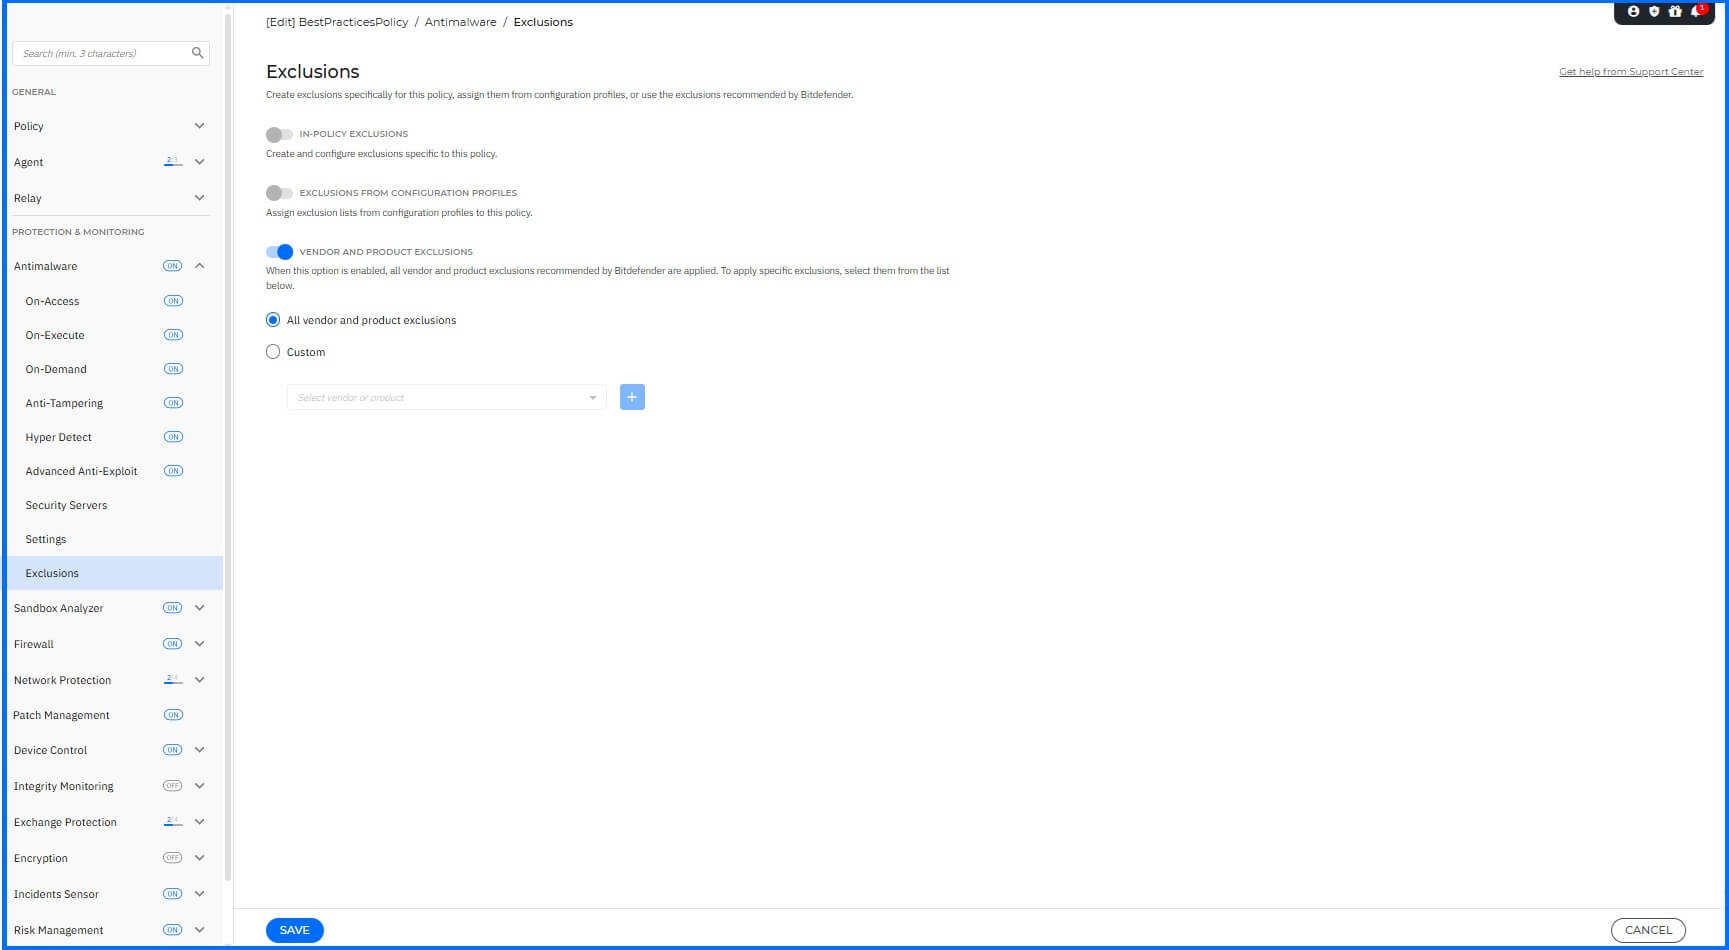 |
Sandbox Analyzer
Sandbox Analyzer analyzes suspicious files in depth by detonating payloads in a contained virtual environment hosted by Bitdefender. It observes their behavior, reports subtle system changes that indicate malicious intent, and provides actionable insight. To configure the Sandbox Analyzer module, navigate to the Sandbox Analyzer section.
Note
Sandbox Analyzer requires on-access scanning. Make sure you have the Antimalware > On-Access module enabled.
We recommend the following configurations:
Automatic sample submission from managed endpoints.
Analysis mode: Blocking: Endpoint Users will have no access to the file until the analysis result is returned to the endpoint from the Sandbox Analyzer.
Default Action: Move to quarantine.
Content Prefiltering:
Applications: Enabled with action Normal*.
Documents: Enabled with action Normal*.
Scripts: Enabled with action Normal*.
Archives: Enabled with action Normal*.
Emails: Enabled with action Normal*.
Note
* The Bitdefender MDR Cybersecurity Breach Warranty requires Content Prefiltering settings to be configured in Aggressive mode.
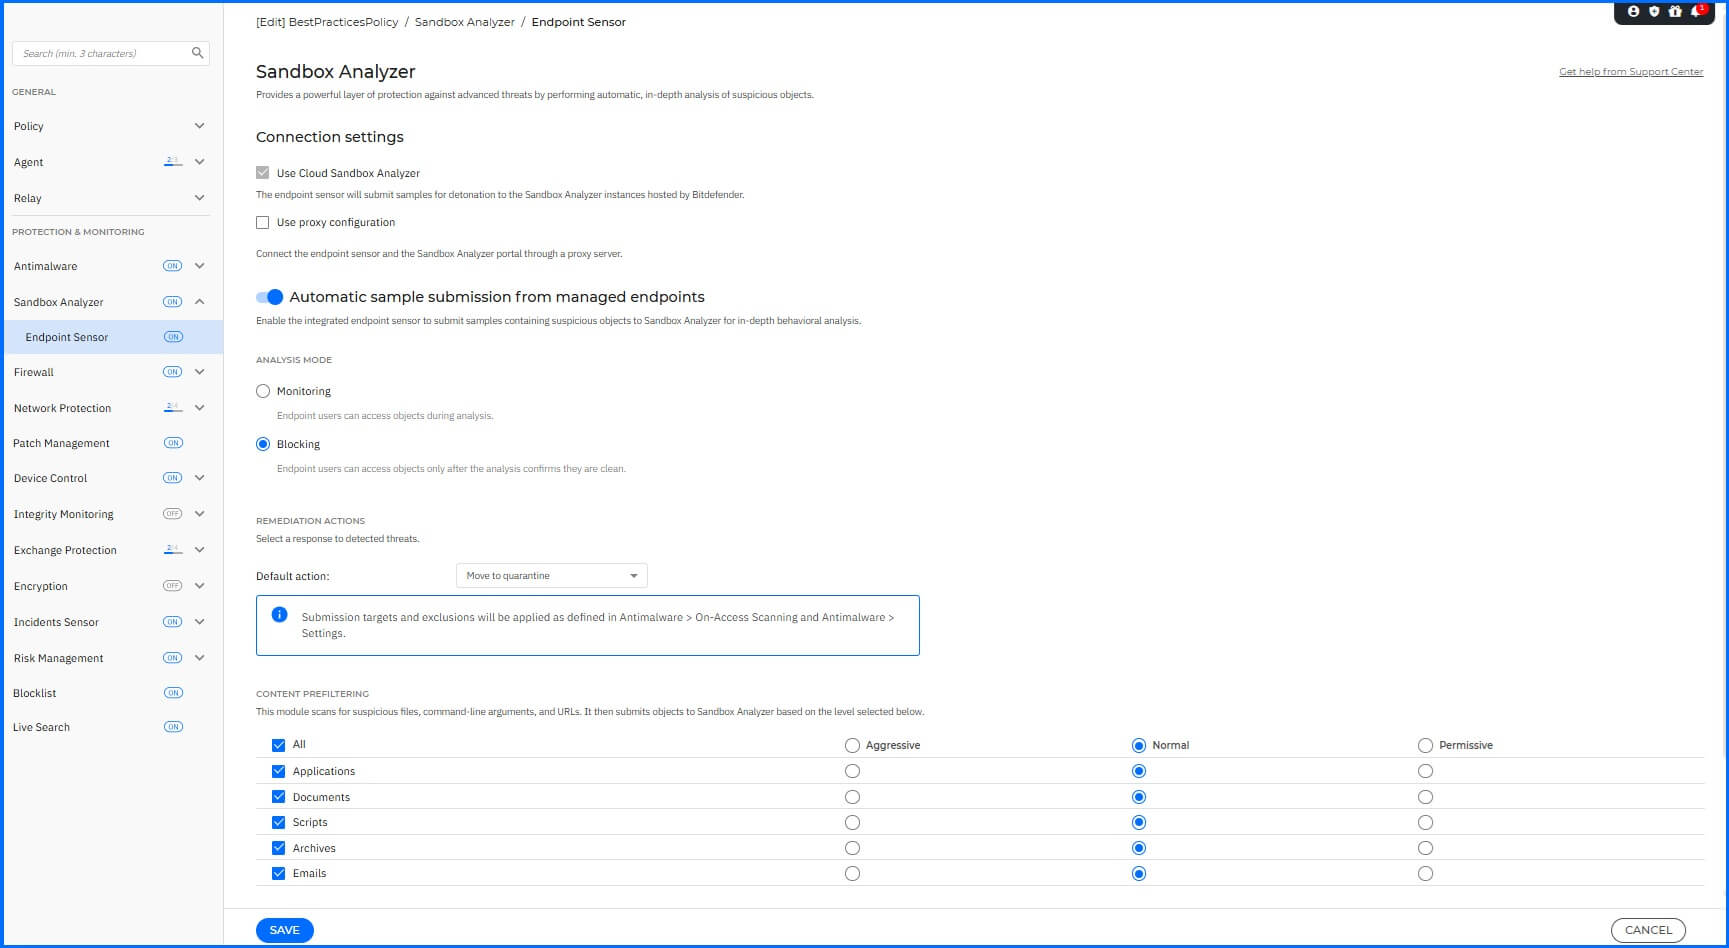 |
More information about Sandbox Analyzer configuration can be found on the Bitdefender Support Center here.
Firewall
Firewall not only gives you the ability to control network traffic by blocking unauthorized inbound and outbound connections but also provides additional capabilities, such as port scan blocking, which are unavailable with the embedded Windows Firewall. To configure the Firewall module, navigate to the Firewall section.
We recommend the following configurations:
Firewall: Enabled.
Log Verbosity level: This is a legacy setting intended for older BEST agent versions (6.x or earlier) only. The feature is no longer supported in newer versions of the agent.
Block port scans: Enabled.
Intrusion Detection System (IDS): This is a legacy setting retained for older Endpoint Security clients only. Host-Based Intrusion Detection System capabilities are now managed by the Advanced Threat Control (ATC) module.
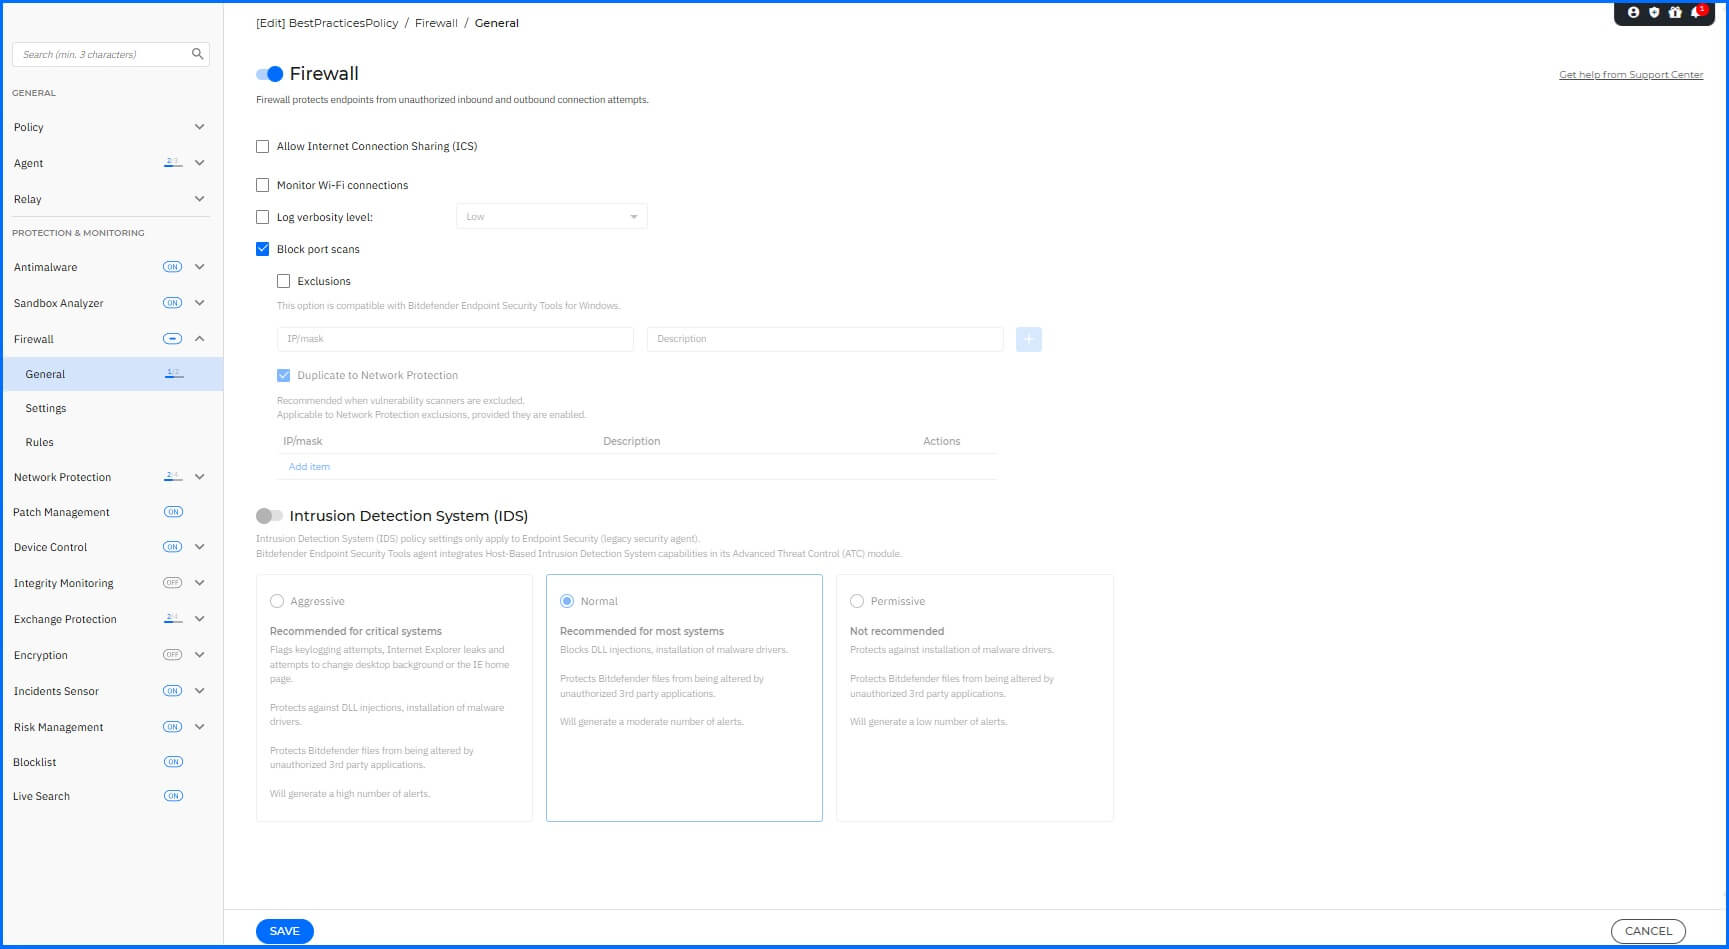 |
More information about Firewall General settings configuration can be found on the Bitdefender Support Center here.
Settings
The firewall's filtering policy depends on the trust level. To apply different profiles to network segments within your company, we recommend applying network profiles to your company's managed networks in the Networks table:
Trusted: Disables the firewall for respective adapters. The traffic is allowed and not filtered.
Home/Office: Allows all traffic to and from computers in the local network while the other traffic is being filtered.
Public: All traffic is filtered.
Untrusted: Completely blocks network and Internet traffic through the respective adapters.
If a network that is not defined is detected, the Bitdefender security agent identifies the network adapter type and applies a corresponding profile to the connection.
We recommend the following configuration for Adapters:
Wired:
Network profile: Public, to filter all the traffic by the configured Rules.
Network discovery: Yes.
Wireless:
Network profile: Public, to filter all the traffic by the configured Rules.
Network discovery: Yes.
Virtual:
Network profile: Public, to filter all the traffic by the configured Rules.
Network discovery: Yes.
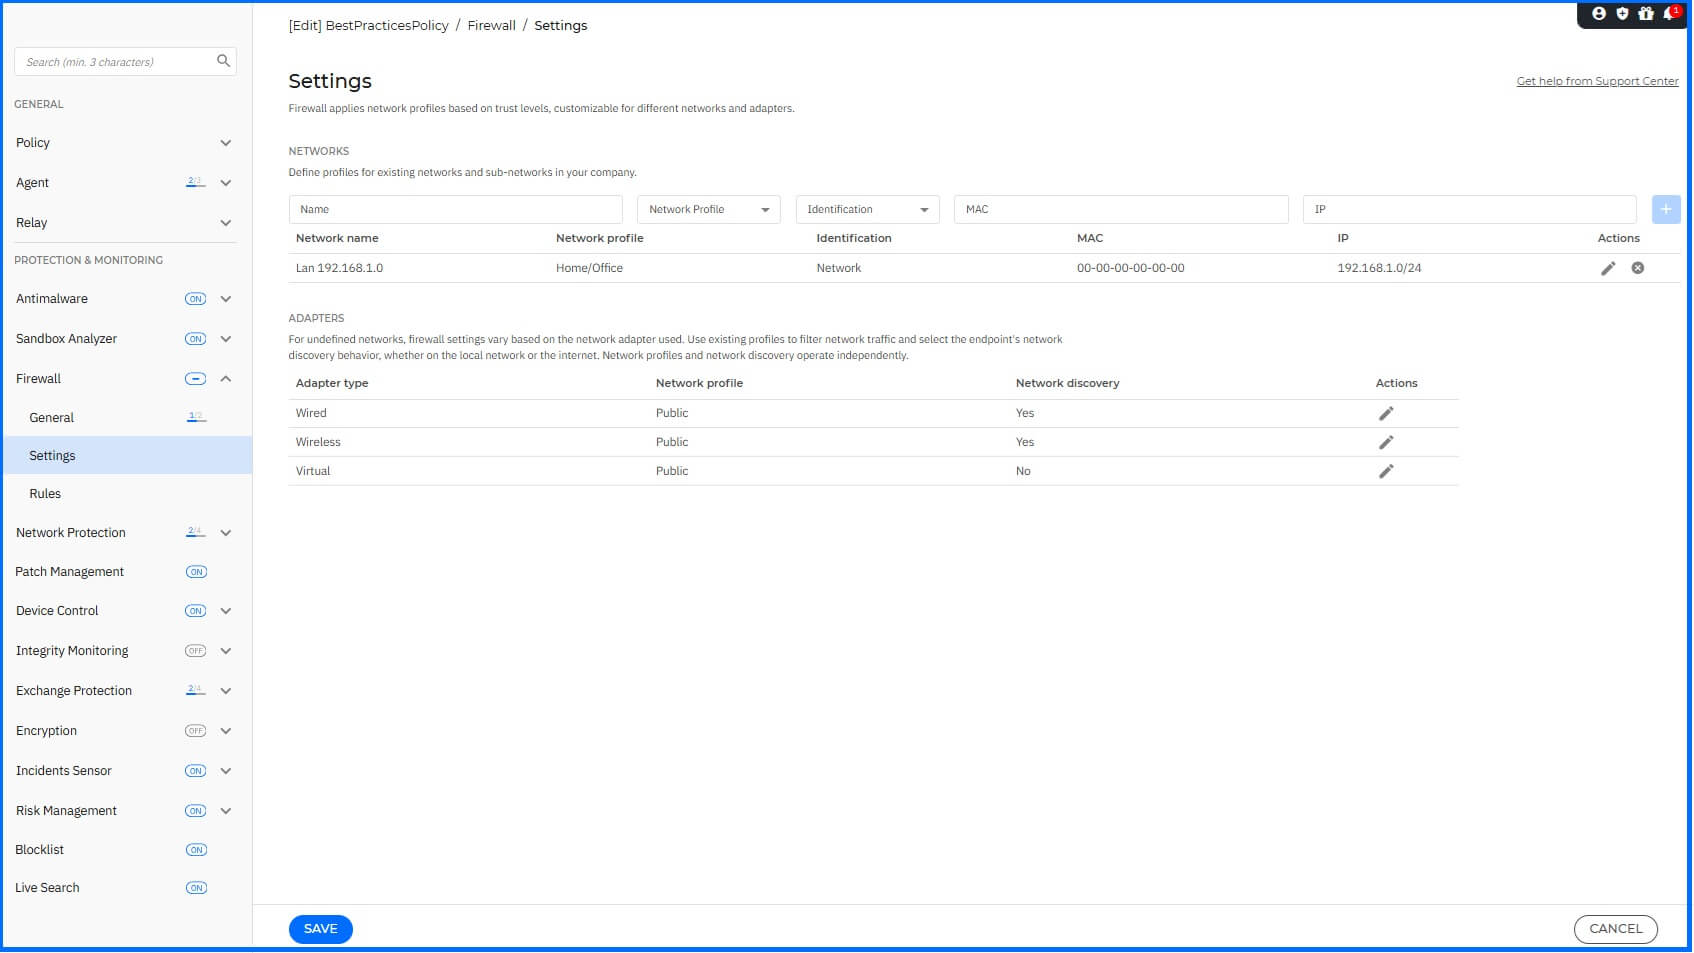 |
More information about Firewall Settings configuration can be found on the Bitdefender Support Center here.
Rules
In the Rules section, you can configure the application network access and data traffic rules enforced by the firewall. During firewall configuration, careful planning is necessary because no two networks or organizations are the same, and there is no one-size-fits-all set of rules. Before implementing your firewall, please read our implementation best practices here.
 |
Note
Firewall module includes one embedded, unmodifiable, and hidden rule responsible for allowing management traffic between GravityZone and the BEST agent. This rule enables endpoint management regardless of any new rules an administrator creates.
More information about Firewall Rules configuration can be found on the Bitdefender Support Center here.
Network Protection
Network Protection provides deep packet inspection, analyzing and processing network traffic in real-time. It is integrated with Threat Intelligence, giving it access to a real-time reputation database. To configure the Network Protection module, navigate to the Network Protection section.
We recommend the following configurations:
Network Protection: Enabled.
Intercept Encrypted Traffic: Enabled with the following options:
Scan HTTPS: Enabled.
Additional Processes: Add the following processes for scanning: wscript.exe; cscript.exe; powershell.exe; pwsh.exe
Scam IMAPS: Enabled.
Scan POP3S: Enabled.
Scan SMTPS: Enabled.
Exclude finance domains: Enabled.
Intercept TLS handshake: Enabled.
With action: Respond with an Access Denied page.
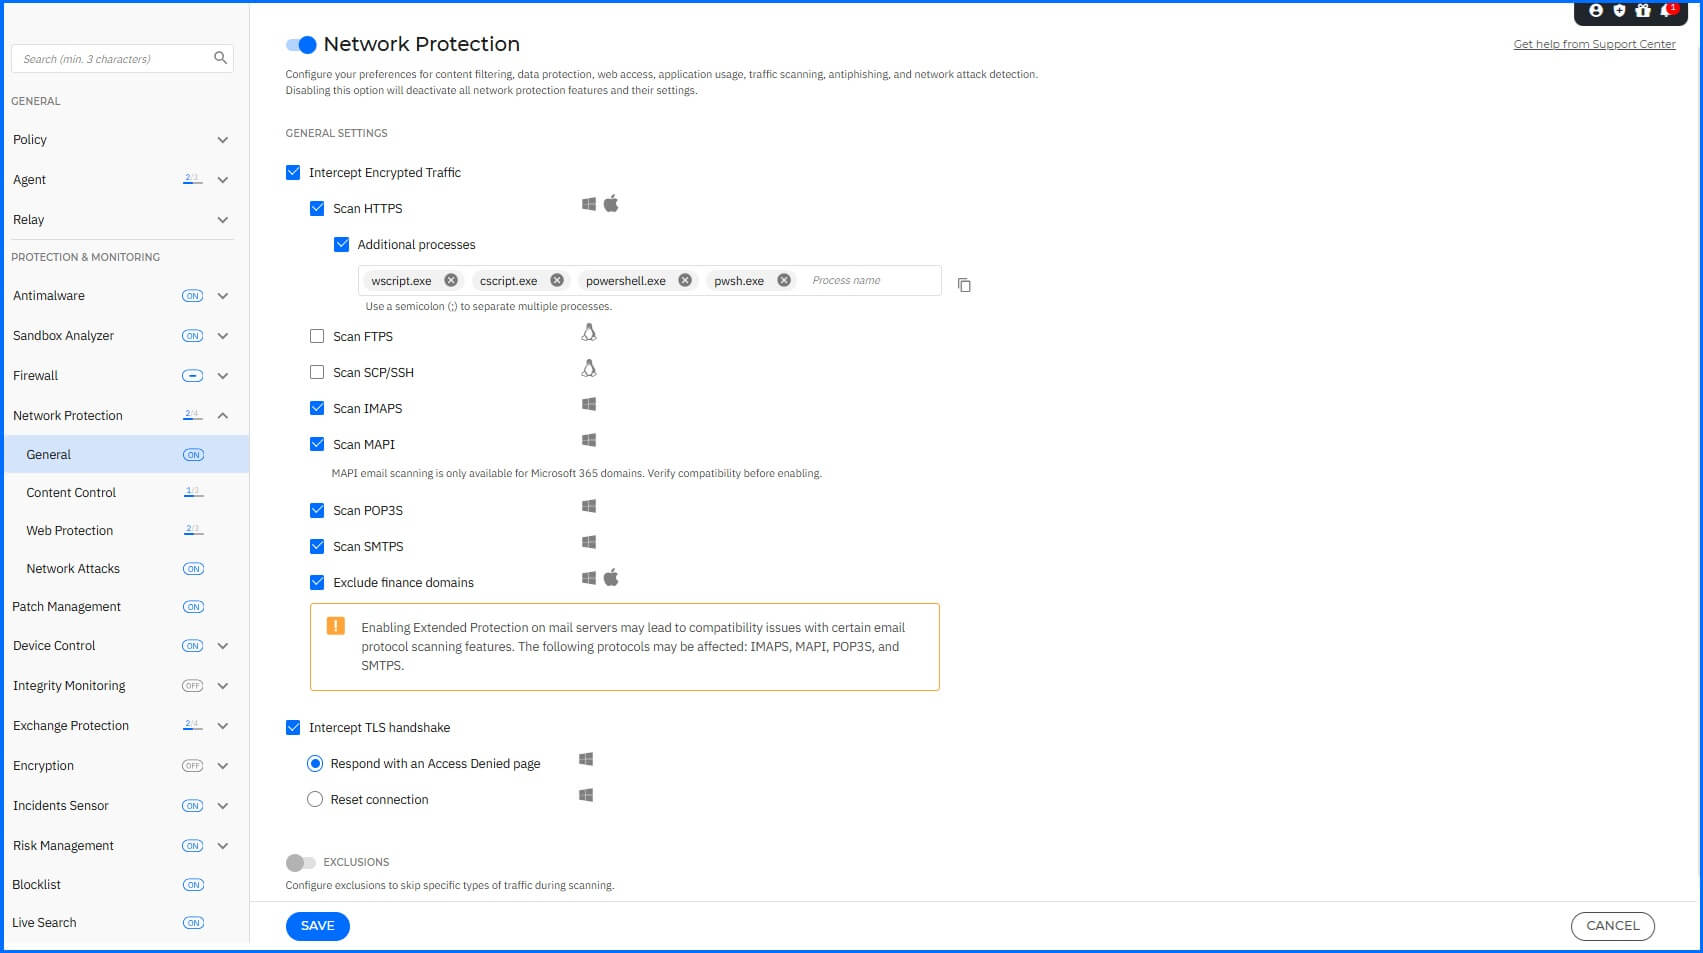 |
More information about Network Protection configuration can be found on the Bitdefender Support Center here.
Web Protection
To configure Anti-phishing, Web Traffic Scan, and Email Traffic Scan navigate to the Network Protection > Web Protection section.
We recommend the following configurations:
Antiphishing: Enabled with the Block action for suspicious webpages.
Protection against fraud: Enabled.
Protection against phishing: Enabled.
Web Traffic Scan: Enabled.
Email Traffic Scan: Enabled with the following options:
Incoming emails (POP3): Enabled.
Incoming emails (IMAP): Enabled.
Outgoing emails (SMPT): Enabled.
Incoming and outgoing (MAPI): Enabled.
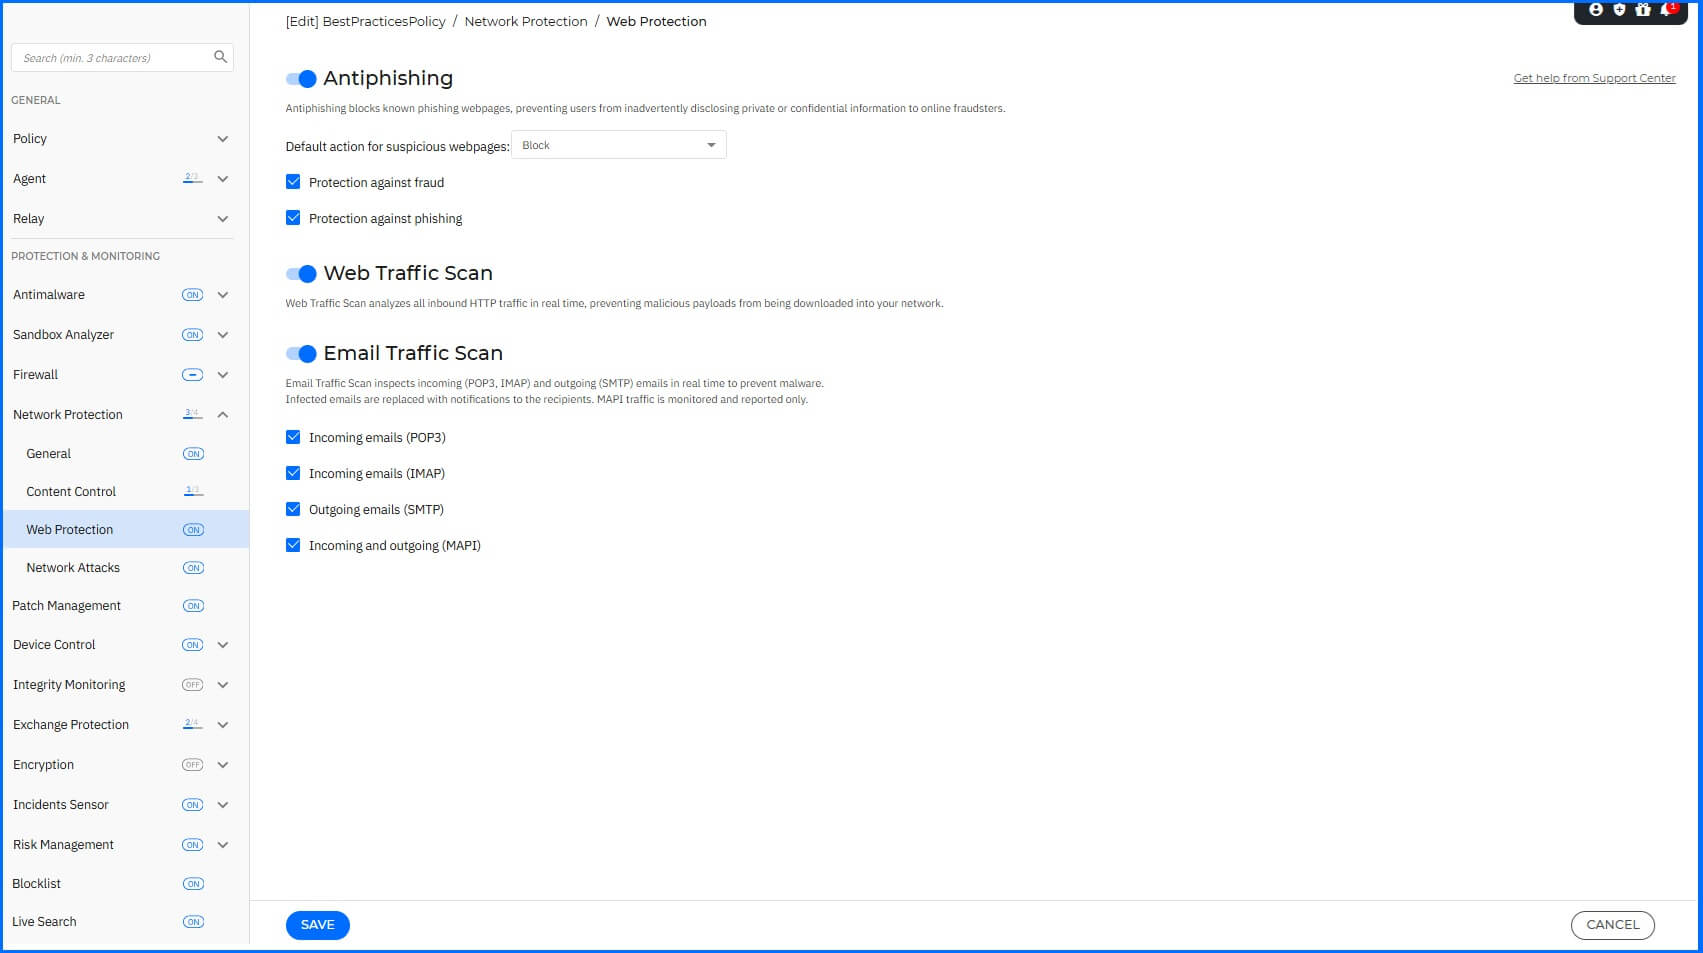 |
More information about Web Protection configuration can be found on the Bitdefender Support Center here.
Network Attack Defense
To configure Network Attack Defense, navigate to the Network Protection > Network Attacks section.
We recommend the following configurations:
Network Attack Defense: Enabled.
Server traffic scan: Enabled.
Inspect Encrypted Domain Controller Traffic: Enabled.
Inspect RDP Traffic: Enabled.
ATT&CK techniques:
Initial Access: Enabled with action Block.
Credential Access: Enabled with action Block.
Discovery: Enabled with action Block.
Lateral Movement: Enabled with action Block.
Crimeware: Enabled with action Block.
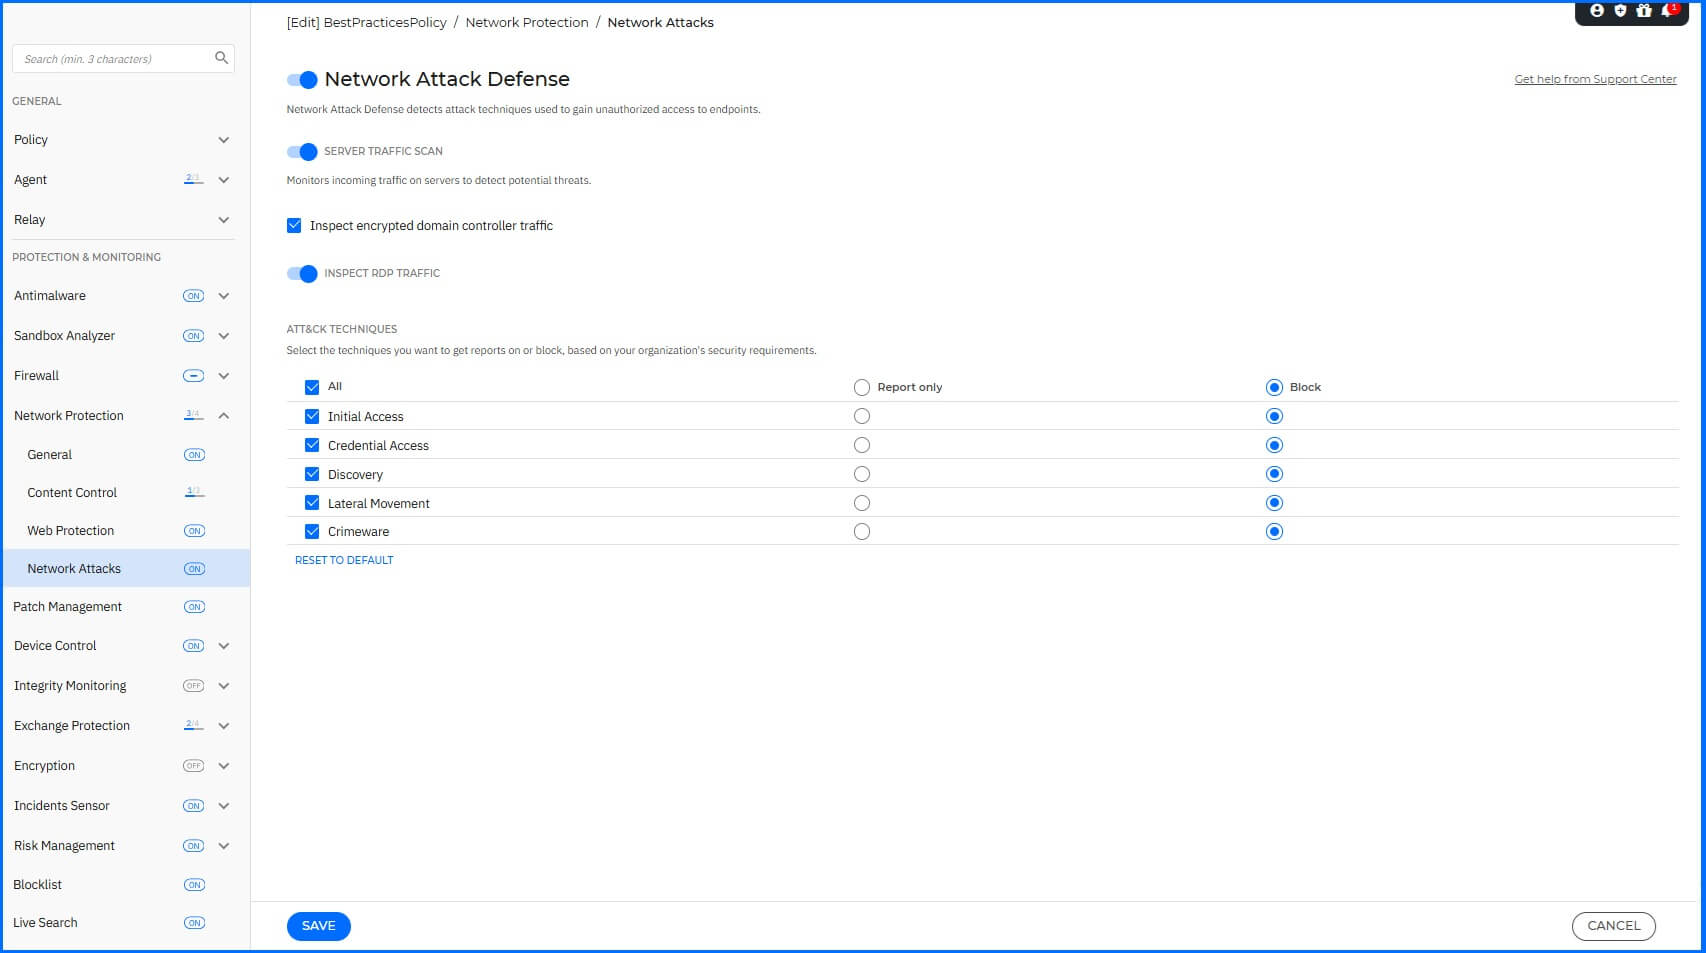 |
More information about Network Attacks configuration can be found on the Bitdefender Support Center here.
Device Control
Device control helps prevent sensitive data leakage and malware infections from external devices connected to endpoints. To configure Device Control, navigate to the Device Control section.
We recommend the following configurations:
Device Control: Enabled.
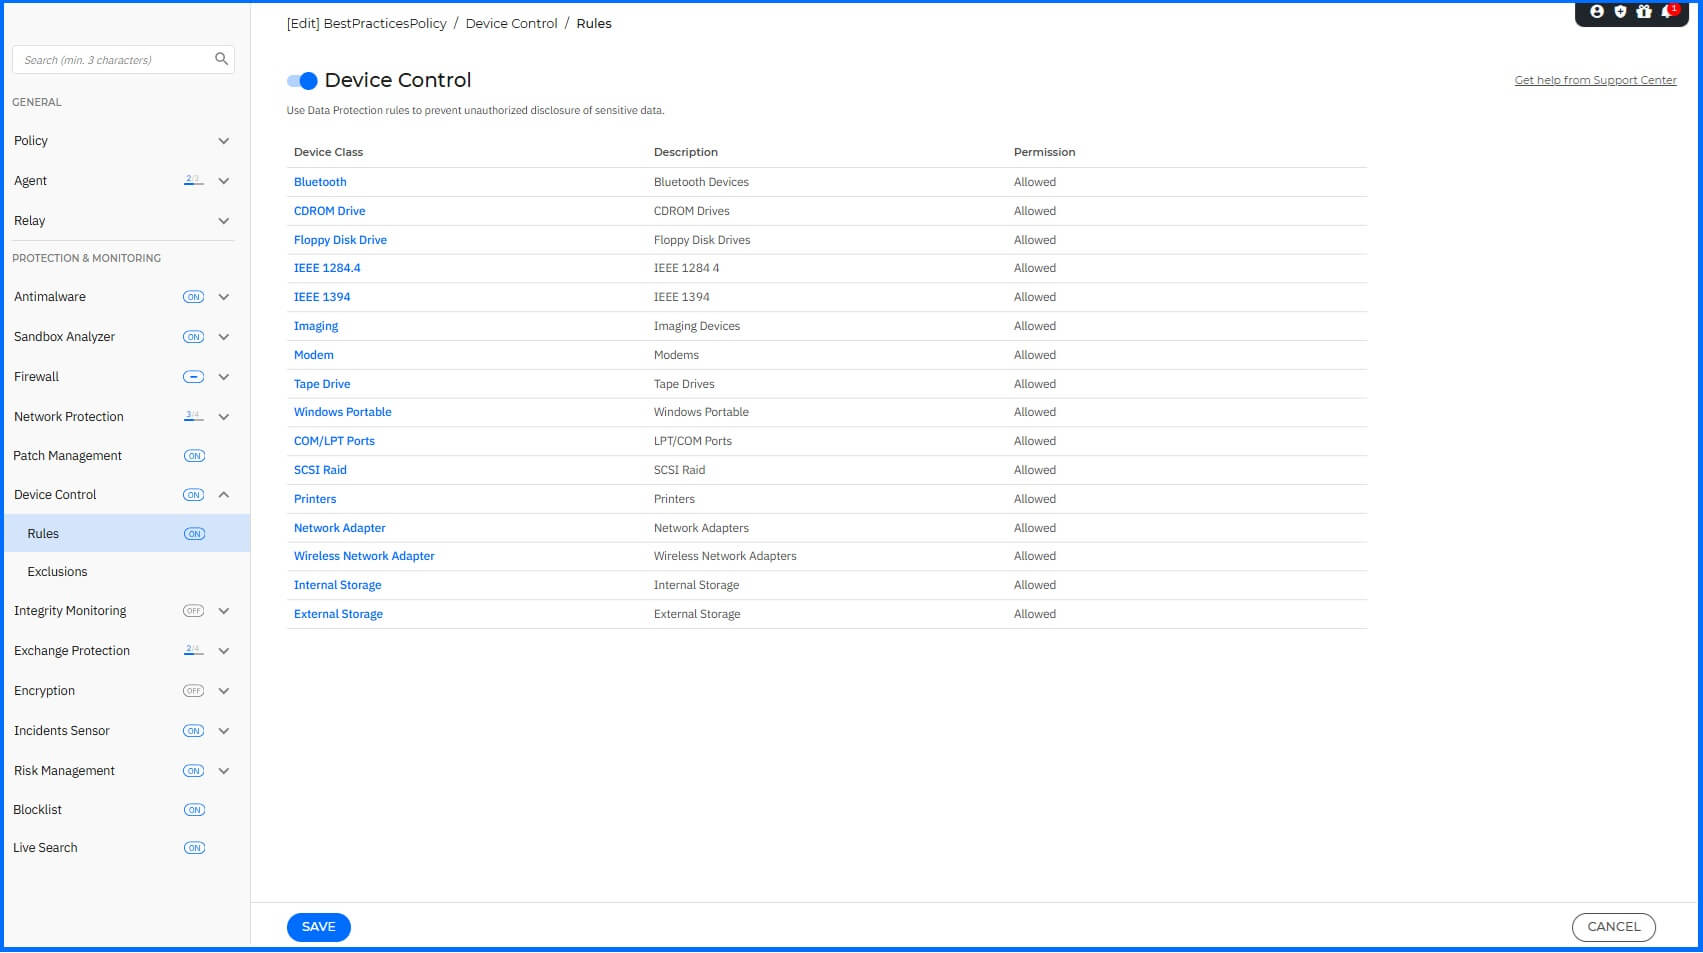 |
More information about Device Control configuration can be found on the Bitdefender Support Center here.
Incidents Sensor
The Endpoint Sensor is the EDR component that collects metadata (not real user data) from BEST agent components such as Network Attack Defense or Fileless Protection. It also monitors endpoint activity, including running processes, network connections, registry changes, and user behavior. Based on this collected data, a response action is generated by the correlation engine, which identifies relationships between events and consolidates them into incidents. Navigate to the Incidents Sensor section for configuration.
We recommend the following configurations:
Incidents Sensor: Enabled.
EDR response action: Enabled
Prevent process execution: Enabled
Terminate the running process: Enabled
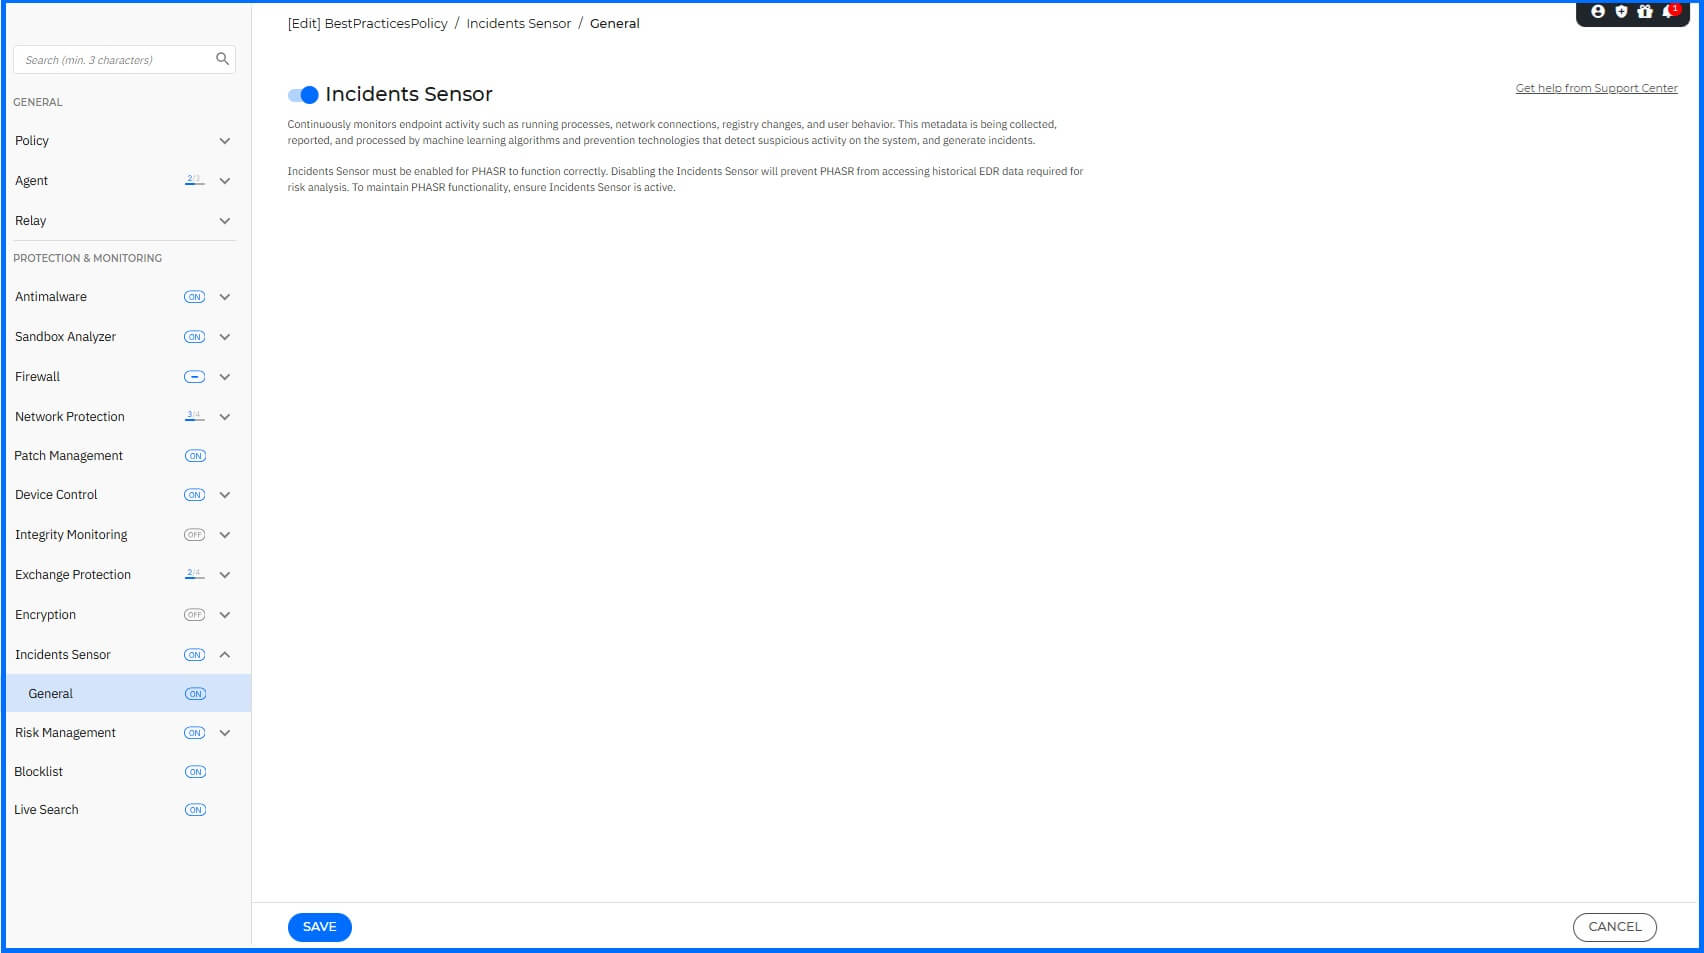 |
More information about the Incidents Sensor configuration can be found on the Bitdefender Support Center here.
Risk Management
With Risk Management, you can proactively secure your organization by gaining a clear and easy-to-understand view of your risks, along with relevant remediation actions across endpoints, applications, and user behavior. Navigate to the Risk Management section for configuration.
We recommend the following configurations:
Risk Management: Enabled
Scheduler Recurrence: We recommend running a risk scan twice per week, on Monday and Wednesday.
If scheduled run time is missed, run task as soon as possible: Enabled
Exclude NSVA IPs from scanning: Enabled. Activate this option to prevent the security agent from blocking and reporting alerts and incidents when the endpoint is being scanned by the NSVA Vulnerability Scanner.
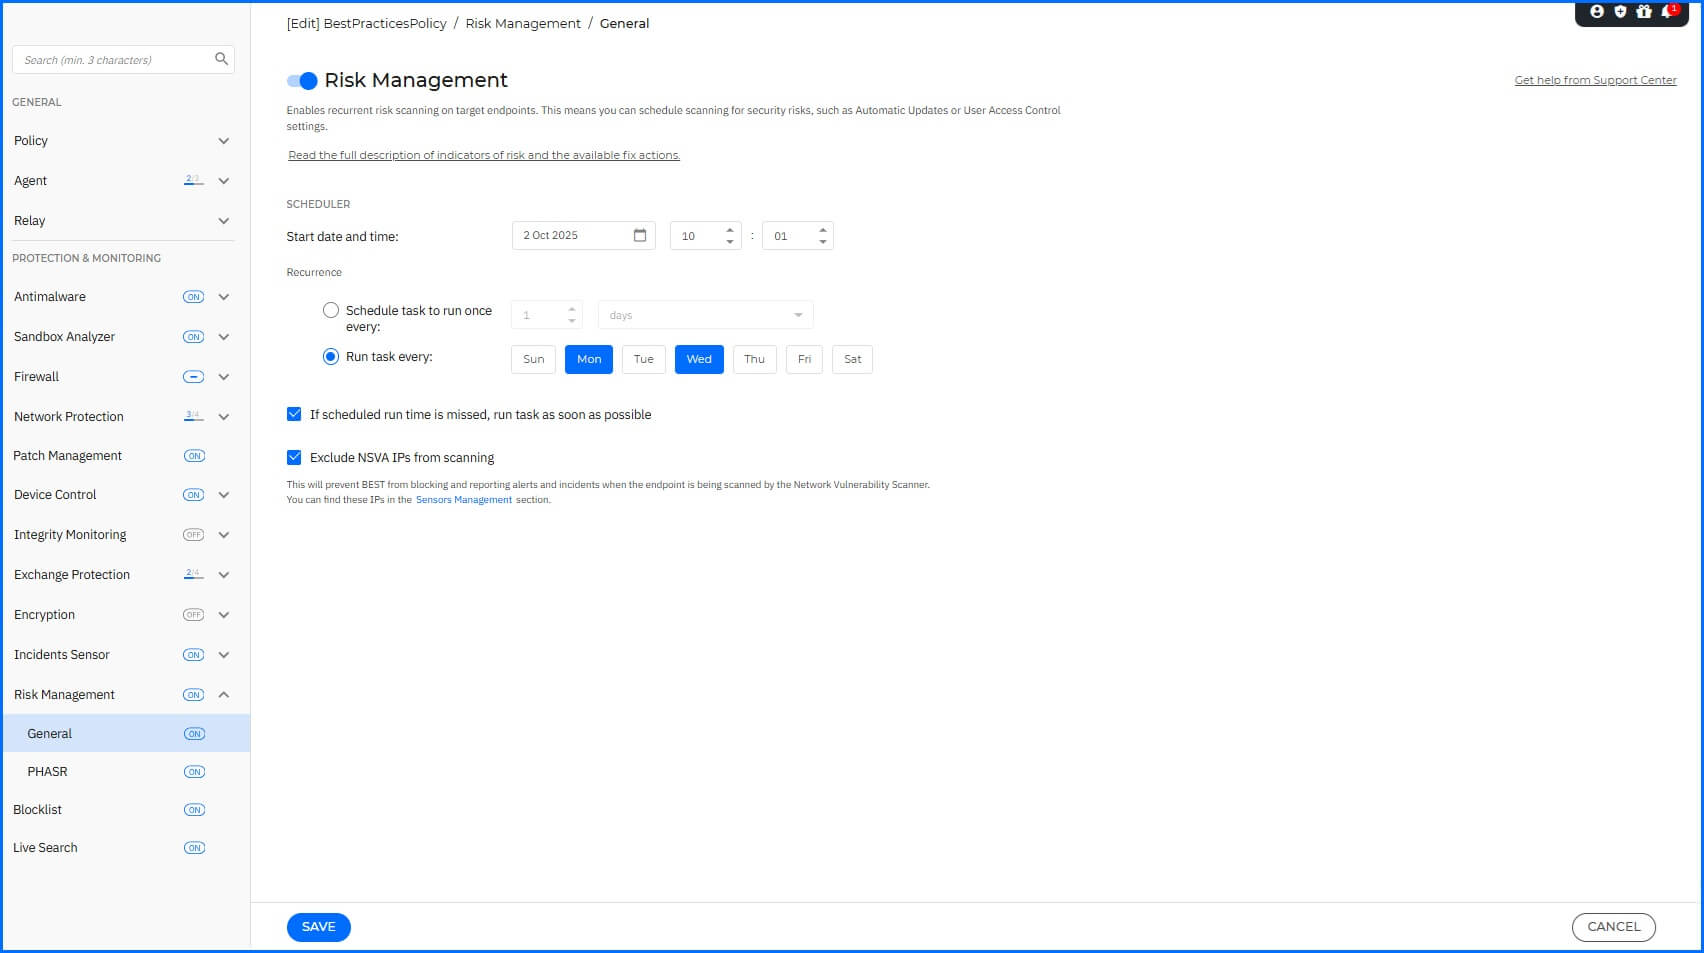 |
More information about the Risk Management configuration can be found on the Bitdefender Support Center here.
PHASR
Proactive Hardening and Attack Surface Reduction (PHASR) works as an extension of Risk Management, proactively hardens your systems by analyzing user behavior to prevent "Living off the Land" attacks and targeted threats. It uses anomaly detection to enable tailored, application action-level blocking, reducing your attack surface without disrupting operations. Navigate to the Risk Management section for configuration.
We recommend the following configurations:
PHASR: Enabled
Living of the land binaries: Direct Control with option Request access.
Remote admin tools: Direct Control with option Request access.
Tampering tools: Autopilot with option Request access.
Piracy tools: Autopilot with option Request access.
Crypto miners: Autopilot with option Request access.
Request access option simplifies the process of allowing end-users to ask for access (and add a business reason note) to an application or command that has been restricted by PHASR in both Autopilot and Direct Control modes.
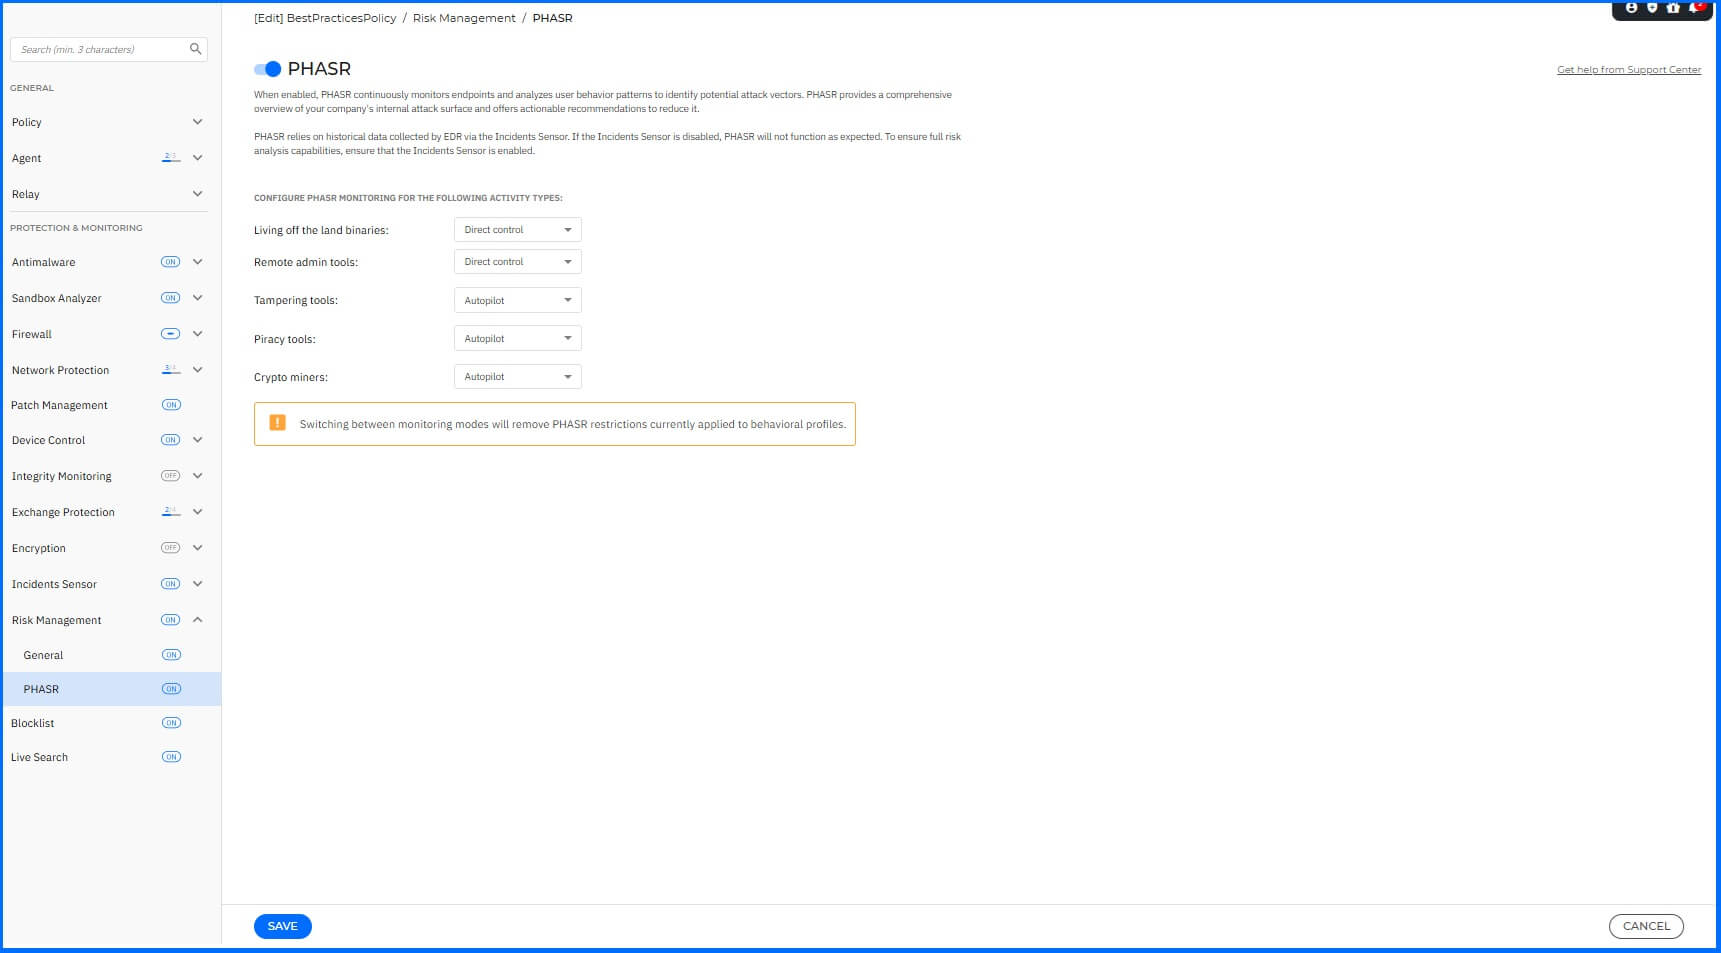 |
The final design of your policy groups often depends on whether your organization operates with a lean security team focused on automation or a large team that requires tight control over every security decision. Organizations with lean security teams may decide to enable Autopilot for every group, while other organizations might decide to control key security aspects directly to align with specific internal compliance or auditing needs.
More information about the PHASR configuration can be found on the Bitdefender Support Center here.
Live Search
Live Search works as an addition to EDR and XDR tools, enhancing threat hunting and active incident response capabilities. Navigate to the Live Search section for configuration.
We recommend the following configurations:
Live Search: Enabled.
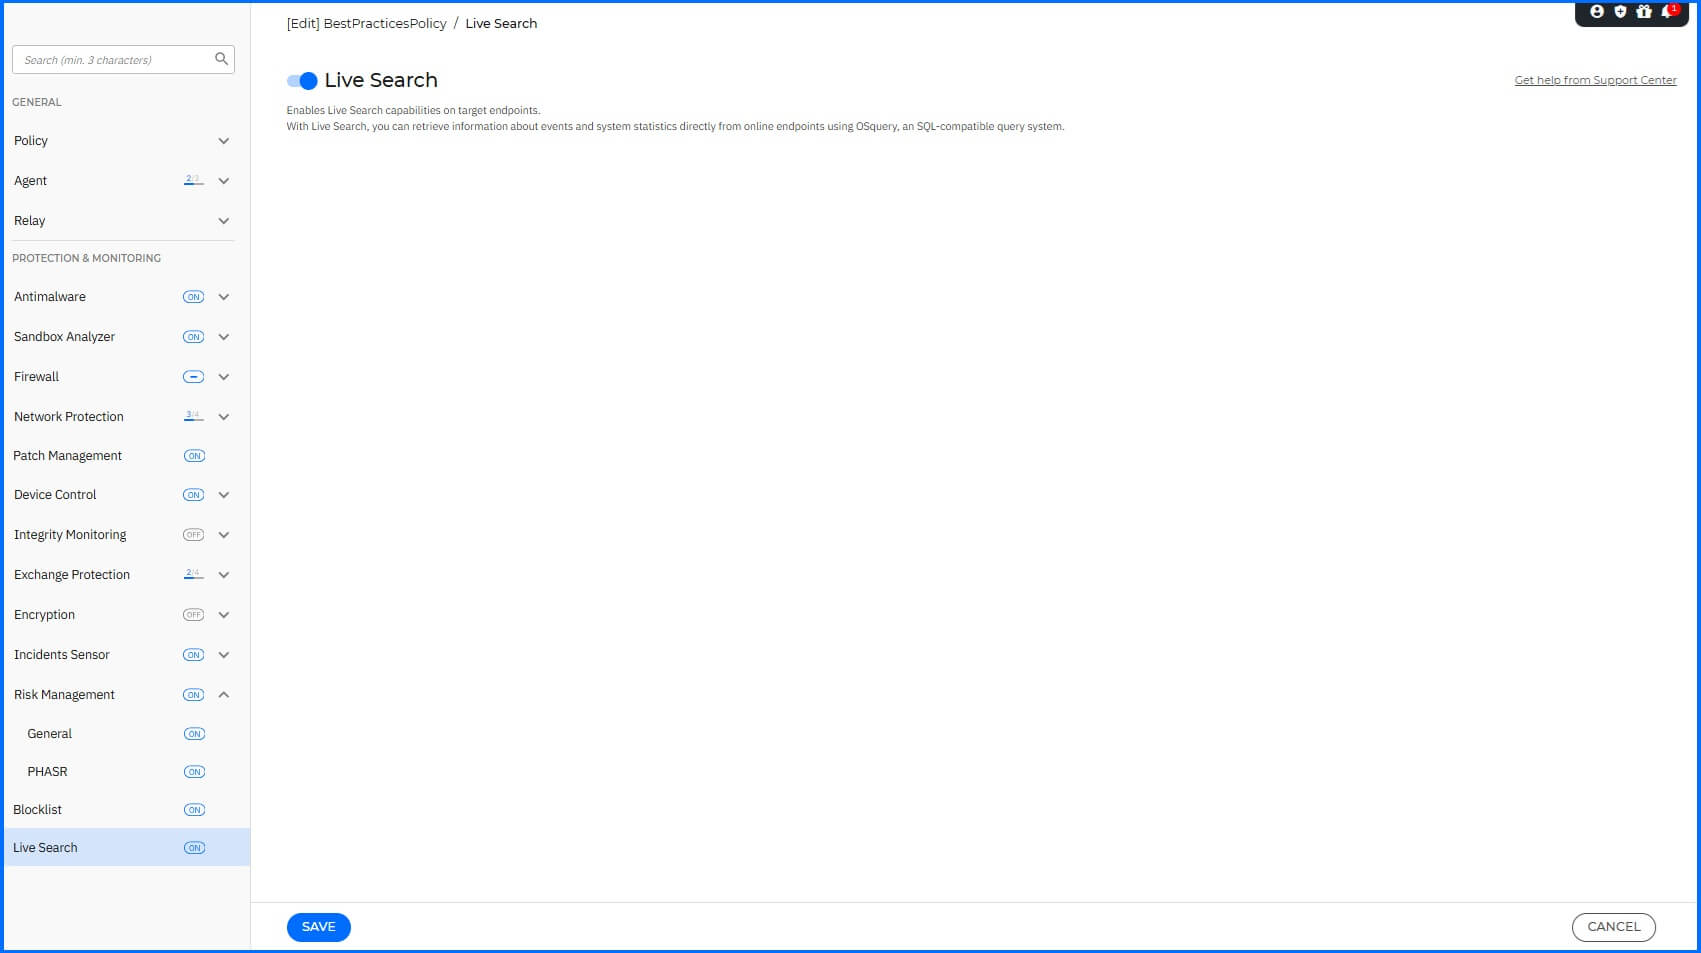 |
More information about the Live Search configuration can be found on the Bitdefender Support Center here.
Support & Feedback
If you require dedicated help with validating, deploying, or tailoring these configurations and recommendations to your unique environment, we encourage you to engage our Professional Services team.
We are committed to continuously improving our guidance. If you have any feedback regarding these best practice recommendations, please contact us: techzone@bitdefender.com
More Resources
Discover the GravityZone full potential with our dedicated video masterclasses: Masterclass
Discover the full potential with our dedicated video masterclasses: Maintenance and Health Checksfor Optimal GravityZone Performance